The mysteries of life…

Take your flash and put it on your camera:

IMG_1076

Aim at a subject while looking through the viewfinder. Take a picture.

Did you see the flash? Through the viewfinder? Yes you did.

How is this possible? When the picture is taken on an SLR, the mirror is raised. When the mirror is raised, the viewfinder is black. So it is impossible that you see the flash through the viewfinder. You cannot have seen what you just saw!

Those of you who do not know, click on.

Continue reading

Cheers

This is one of my standard party shots:

MVW_1690

It is three-dimensional, shows fun, and shows the subject well. If the subject is the worse for wear, the blurring hides that, which subjects tend to like for some reason.

You get a picture like this by:

  • Using an external flash.
  • Bouncing that flash behind you, off a wall or ceiling.
  • Using a wide lens : <24mm on a crop camera, or <35 on full frame.
  • Getting close. No, closer. No, even closer!
  • Using aperture or manual mode with a wide-open aperture (small “F”-number).

Oh dear, I seem to have given away another secret.

Guess what.  The days that “giving away secrets” was a bad thing are long gone. We call this The Internet. You can come here every day in the secure knowledge that I will never “hold back information”. My mission is to fill the world with better photographers, and to show you all how simple this is. Because it is.

Indoor Flash

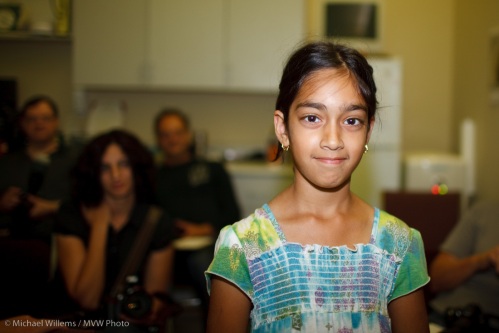
Here’s a few demo shots from a kind volunteer (a student’s daughter) at a recent camera course I taught. This bit was about “flash”.

First, pop up the flash and use “P” or “Auto” mode and you get the picture that makes people hate flash:

MVWS0106

Then enable “Slow flash” or “Night portrait mode” and you get a better picture.. yeah, it’s better. But not all that much:

MVWS0105

Then put your big flash on top of the camera (e.g. an SB-900 or 580EX II, or their slightly smaller equivalents SB-600 or 430EX II). And aim that flash behind you.

Yeah. Behind. So it bounces off ceilings and walls behind you.

Much better. Much. See:

MVWS0107

And then if you want extra “character” and “depth”, bounce off a side wall, if you can find one.

Now you get three-dimensionality, depth, character as well:

MVWS0108

I mean – how cool is that? And all this was done in “P” mode, with no special stuff, with no settings on the camera, no required knowledge of aperture, no complicated techniques.

Flash is wonderful once you learn how to play with it. And it is easier than ever.

The art of the dramatic portrait

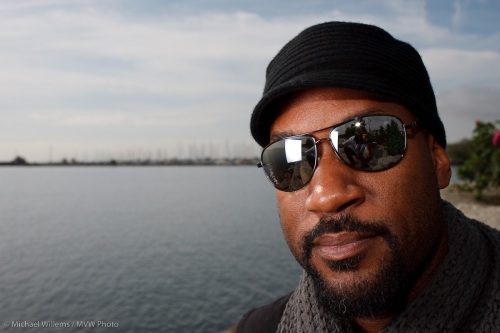
So how did I use the softbox I showed myself holding yesterday? Or rather, what picture did I get in the end?

As a reminder, I was using a Canon 1Ds MkIII with a 580 EXII flash on the camera in TTL master-slave mode in group “A”, and a 430EX II flash in my left hand as slave in group “B”. The “B”-flash had a Honl speedstrap and a Lumiquest Softbox III on it. The E-TTL A:B ratio was set as 4:1, so the handheld second flash fired two stops brighter than the on-camera flash.

I was in Aperture Priority mode (Av), and to darken the ambient light and the sky I used an Exposure Compensation setting of -2 stops.

Because my friend has dark skin and was wearing dark clothes, I also used flash compensation (“FEC”) of -1 stop. Otherwise he would have been overexposed (the camera would have tried to make him “18% grey”).

The result:

MVWS9175

(I left the softbox and my reflection in his glasses deliberately, of course, since I was showing him the use of this softbox. Else I would have moved his head to camera left and down a bit).

Finally: his face is a tiny bit distorted because of the 35mm wide angle lens. I could have used the 50mm lens instead, or even the 24-70: but I think this look flatters him. h

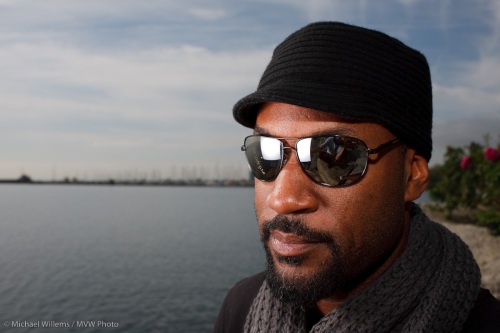
One more sample:

MVWS9176

Shot of the day

..is me shooting my friend Dal yesterday on the Lakeshore in Port Credit:

MVWS9175-2

As you see I am reflecting in his glasses (with brightness enhanced to show me, not him, of course). I am using my 1Ds MkIII with a 580EX Flash on it, and a 430EX in my left hand close by, fitted with a small Lumiquest Softbox connected to a Honl speedstrap.

That softbox (held at about the same distance from the face as its size) gives nice soft light, which is very important for someone with darker skin. You can see my favourite Domke camera bag in the background.

And yes I tend to wear a tie.

And I’ll show you the photo tomorrow.

Motion a drag?

…only if you drag the shutter. You may have heard this expression, “dragging the shutter”. What does it mean?

It means taking a flash picture and then letting the shutter stay open for a while longer, so it “drags”.

Why? To capture more light. Not more flash light – that comes and goes in a thousandth of a second or less. No, it is ambient light we’re after. Dragging the shutter means the backgrounds get some light, instead of being dark. So we get better flash pictures.

There is a danger, of course: the danger of motion during that extra extended shutter time. And a very particular kind of motion:

MVWS1197

What is happening here? The flash lights up the foreground, and the flash is 1/1000th of a second, so that is frozen in time. But the background is lit by ambient light so is affected by hte long shutter speed. A very recognizable “ghostly” kind of look.

How to drag the shutter?Turn on your flash and:

  • On Nikon cameras, activate “slow flash” and use shutter or aperture mode.
  • On Canon cameras, simply use Tv or Av mode.
  • Or on either, use “night portrait” scene mode (but you don’t use scene modes, do you?).
  • Or use “manual” and select a slow shutter speed, like 1/15th second.

Have fun trying.  This takes a bit of practice, and everyone has their own limit as to what they will accept.

Let there be light

..and let it be managed.

I have talked about this many times before, and I will do it again. When you add light, and manage it, massage it, and work with i, you get drama, cheerfulness, whatever you like. So when you make the light, you make the mood.

Case in point. In the model shoot I did Monday on Toronto Island, here’s the light the way it might look to a casual observer, and the way it might appear in a properly exposed photo:
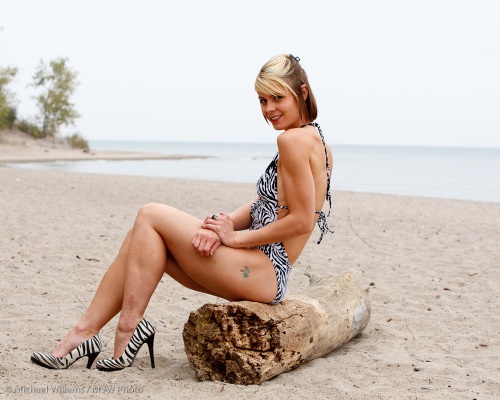
MVW_2600

Fine. Nice. Pretty young lady (Miss Halton, incidentally) on the beach.

Now let’s work with that. That background is a bit bland to my taste, so let’s darken it. The colours on the model are OK but I’d like them to stand out more.I want drama, and I want the model to stand out, not to be just a thing on a beach.

So first I turn down the ambient exposure. Two stops.That will make light blue into dark dramatic blue. Then I add a flash, on a light stand – shot through an umbrella to get soft light.  I fire that from my on-camera flash using E-TTL II IR technology. I turn the flash up or down as needed.

I now get the result I had in mind.

MVW_2601

That’s better.

And more importantly: that’s entirely different. And that is the photographer’s task, to make things the way he or she wants them. You can say you like, or you don’t like – but you can’t say it isn’t different!

How I rate photos in Lightroom

It occurs to me that it may be helpful to share my “rating”-workflow in Lightroom. I go through the following sequence:

  1. Import everything as 2 stars
  2. Go to grid view and step through them, and reject any that are technically bad (e.g. out of focus or badly exposed, or the subject is blinking). They get an “X” marking. I exclude X from my view.
  3. Go through them again and rate any that “could possibly be used” as 3.
  4. Go through the threes again and rate any that are “great in this shoot” as 4.
  5. Go through the fours again and give any that are “great and can be used even outside this shoot as portfolio shots” a five rating.
  6. Then I select just the 4 and 5 stars rate them all as PICK.
  7. Then I step through the 3 stars and decide with of them I want to use; I rate those as PICK also.
  8. Then I check for doubles and unpick those.
  9. Then I do any post on my picks.

Done.

Here’s a couple of (unedited)  4-star images from yesterday’s Toronto Island model shoot:

MVW_2386-2

MVW_2360

(70-200 f/2.8 IS lens on 1D MkIII, manual exposure -2 stops from ambient and key flash though umbrella, fill flash on camera.)

Balance light

You know the problem. You shoot a living room with large windows and what do you get?

OK outside. A bit light but OK. But dark furniture. Like, silhouettes.

Ah no – you went to a photo course, so you know about “exposure compensation” – the “+/- button”. So you turn that up to, oh, plus two stop (to make it brighter) – and yes, now the furniture looks light. Nice.

But uh oh – the window is now all white. Nothing visible. Like a gateway to heaven in “heaven can wait”.

Fortunately, you have also done a “mastering flash” course. So you know to:

  1. Turn exposure compensation down to make the sky nice and blue
  2. Then turn on the flash (and turn it around so it lights up the wall behind you)
  3. Then take a test shot
  4. Then decide whether to use “flash exposure compensation” – the “plus minus with flash next to it”. This turns the flash power up or down. You decide you need some more light on the furniture so you turn this to plus one stop.

Now here’s your picture:

MVWS0145-2

Nicer, no? Try this technique if you haven’t yet. And you can compete with the best interior photographers.

Straight light

You know about Rembrandt lighting, loop lighting, broad and short lighting, and so on? If not, you will. But today a note about simple lighting for models, women, in general anyone who wants to look their best and show youth and beauty rather than experience and character (which can be a euphemism for age).

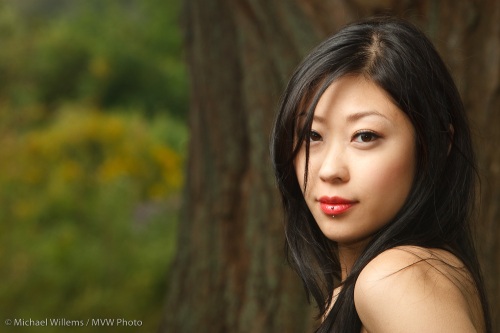
That is straight, flat lighting. Like this:

IMG_0162

As you see, that is nice, flattering light.

Whenever I shoot anyone where the main emphasis is on this person looking young and attractive, I draw an imaginary line from their face straight up at 45 degrees, i.e. not to either the left side or the right side. Where that line straight from their face hits the wall or ceiling, that is where I aim my flash. (An external flash – please, you don’t use the on-camera popup flash, do you?)

And when I do that, pictures like the one above result – when the model is as pretty. Even when the model isn’t as pretty, this light is best if you want to minimise wrinkles.