It's too bright outside. Quick! Hand me a flash!

We do not use flash “because it is too dark” – at least not just.  We very often use flash because it is too bright outside.

By using a bright flash, we can:

  1. Decrease the exposure of the background, thus making it less bright
  2. Then use the flash to increase the exposure of the foreground, to avoid darkening it as a result of step 1 (becasue this would otherwise happen).

Step 1 also

  • Increases the colour saturation.
  • Allows you to make your subject stand out against the background.

Step 2 also allows you:

  • To accent parts of your shot,
  • To “model” shapes,
  • To throw light where you want it.

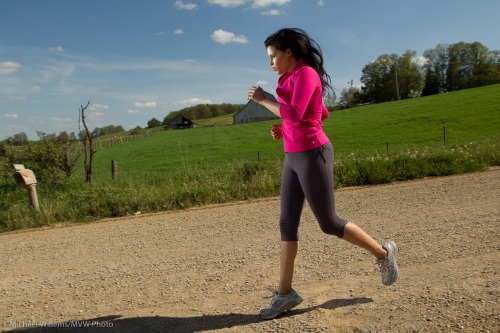
At yesterday’s all day Country Creative Lighting Workshop in Mono, Joseph Marranca and I used technique to do exactly that. So you turn a simple snap into this, instead:

A female runner

Female runner on a country road

For this, we used technique. Technique that included (apart from a talented model):

  • The use of two speedlites, set to manual, fired by Pocketwizards
  • A Honl Photo Traveller 8 portable softbox on one
  • Manual camera exposure settings

Two simple off-camera speedlites can create a shot like that? Yes they can. 430 EX speedlites can overpower the sun? Yes they can. Try it!

Flash consistency – a note

So you are surprised that your flash pictures always turn out differently and unpredictably, especially when using automatic (“TTL”) flash?

Then this may help:

A. First, worry about the background, ambient light:

  1. First, decide “should the background light do any work?”. If you are using an automatic or semi-automatic mode, like P, Av/A or Tv/S, the camera will try to light the background well. so it will not just be the flash doing the lighting.
  2. Realise that there are limits to the previous: on Canon always in P mode, and on Nikon in P and A when “Slow Flash” is disabled, the camera will limit shutter speed to avoid blur.
  3. So if you want total predictability of the background, use manual, and set your meter to the desired ambient lighting level (I recommend you start at -2 stops, i.e. the light meter points to “-2”). See a recipe below.

In a typical room, a starting point might be 1/30th second, f/2.8, 400 ISO, and the flash pointed behind you. Auto ISO is not recommended!

B. Then, concern yourself with the flash:

  1. The foreground is mainly lit by flash, not by your Av/Tv/ISO settings.
  2. Canon cameras in particular try to avoid overexposing part of the picture, so even a small reflective object in the flash picture can result in a dark, mainly underexposed photo.
  3. The flash exposure metering is, on most cameras, biased toward your focus points. So the camera looks mainly where you focus.
  4. If you take a picture of something bright (a bride in the snow) the camera will underexpose it to give you a grey bride. If you take a picture of a dark object (a groom in a coalmine) the camera will overexpose it to give you a grey groom.
  5. To fix this, you can turn the flash up and down using flash exposure compensation (“Flash Exp Comp”).
  6. Play with the light: aim your flash at walls or ceilings if you can. and create a “virtual umbrella”.

Try it and see if you get more consistent!

Here’s a typical recent flash picture, of a nice photographer I met recently:

Flash picture

A flash photo - yes really.

Doesn’t look like your usual “deer in the headlights” snap? That’s because I was following my own suggestions above. Note I also used a Honl Photo 1/2 CTO gel, to make the flash light look a bit more like the background Tungsten light. I like warm backgrounds, but I often make them a tiny bit less warm this way.

Soon: review of the Honl Softbox

I have been using the Honl Photo Traveler 8 softbox, and will post a review soon: in the next week, if I can.

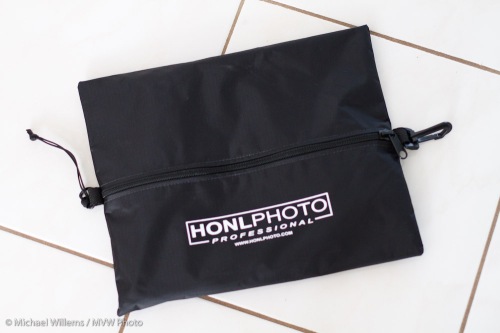
Here’s the softbox, packed in its optional traveling case:

Honl Photo Traveler 8 softbox

Honl Photo Traveler 8 softbox

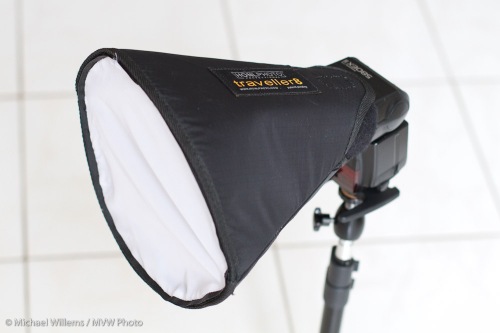
And here, unpacked, assembled, and attached to a speedlite:

Honl Photo Traveler 8 softbox

As always, the convenience and sturdiness is what sets these Honl products apart. We can all do things in a thousand ways, but:

  • When your customer (or worse, your customer’s personal assistant or PR person) is tapping their fingers and getting visibly impatient and you know you have an hour to go to even set up your shoot, every second counts.
  • When you have to personally carry everything you use, every gram counts.
  • When it has to fit into bags, every fraction of an inch counts.
  • When you shoot for a living and hence throw things about, every bit of sturdiness counts.
  • And when you are far from home, every bit of reliability counts.

I think that is why I like these Honl products so much: it is obvious that Dave Honl lives in the same world as I do. And I suspect, the same world many of you live in. And no, Dave is not paying me for this; and yes, I plan to do more workshop together with him like the one I did in Phoenix in March: stay tuned.

But first, a review, soon, of the softbox, and some tips for its use.

Why use a hair light?

One of my favourite ways to use a light is a hair light. Add it to almost any picture to add some interest, contract, and separation from the background.

So you go from this picture of a very nice student in one of my classes recently:

A picture showing good lack of a hair light

Lacking a hair light

…to this subsequent picture of the same young lady:

A picture showing good use of a hair light

Using a hair light

Much nicer, no? And look, even the smile improves!

OK, I am kidding about t he smile. But the picture is better. A dark-haired person against a dark background particularly needs a hair light.

It is aimed directly at the subject from the back, usually diagonally. Use a grid (like the Honl Speed Grid) or a snoot for even more controlled light (like the Honl Speed Snoot).

What's in YOUR bag?

What do I carry in my photo bag? I am often asked this question. I was asked it again a few times at the Henry’s Photography and Digital Imaging Show this past weekend, where by the way I spoke to, and with, thousands of people, and loved every minute.

(By the way, if you visited the show and have questions, do feel free to email them to me and I shall answer them on the blog – and sign up for email).

So my bag looks like this:

A photojournalist's camera bag and contents

Camera bag and contents

What does it not contain? A camera. This is on my shoulder, for fast convenient access. Always, even when I am travelling. I do not put the camera in a bag.

What this Domke bag does contain is:

  • Two spare lenses, at least one of them a fast prime like the 35mm f/1.4 or the 50mm f/1.4
  • Lens hoods, one for each lens
  • A 580EX II flash
  • A 430EX II flash
  • Flash Modifiers: A Honl grid and a set of Honl bounce cards and a Honl gel set in a roll container, as well as a Gary Fong lightsphere
  • A Hoodman Hood Loupe
  • A container full of memory cards
  • A small grey card
  • Wallet
  • Note pad
  • Spare batteries for cameras and flashes
  • Business cards
  • A small brush
  • Pens
  • Pills (headache, throat)
  • Plastic bags
  • Shower caps, elastic bands, etc

You can never be too prepared. Be like NASA (“do I really need each gram of this weight?”), but once you decide you need it: bring it!

Reiterated Trick

I mentioned this once before as an aside, but it is worth a post: a trick that tells you which flash is casting what light in your images.

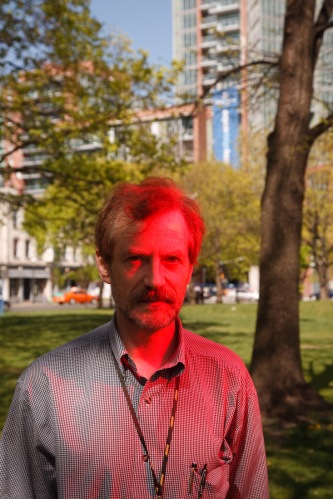
Say I am lighting a person (like me) with a flash outside. Nice:

Subject lit with an off-camera flash

Subject lit with an off-camera flash

But how can I be sure this light is from the flash? I mean, is that really all the flash? Or is the subject in the sun? Or in a mix of light?

Solution: put a coloured gel onto the flash. Now you see:

Subject lit with an off-camera gelled flash

Subject lit with an off-camera gelled flash

Ah. So it was the flash! Not only that – you can see exactly where it is -and importantly, where it is not – illuminating the subject.

Useful trick, eh? One more reason to always carry gels along with you.

Pic of the day

And how would you like to take pics like this, shot about an hour or two ago on my way back home from day one of the excellent Henry’s Digital Imaging Show:

Oakville.com party in Oakville

Oakville.com party in Oakville

How did I shoot this:

  • A Canon 1D Mark IV camera with a 16-35mm f/2.8 lens
  • The lens set to 16m (equals a “real” 22mm)
  • A flash on the camera set to -1 stop flash compensation
  • The camera set to -2 stops on the meter in manual (1/30th sec at f/4 if I recall correctly)
  • A Honl Photo half CTO gel on the flash
  • White balance set to “flash”

That’s how it’s done. Come to my courses and I’ll explain more!

Fun with Gels 3

I shot a night club yesterday.

Dark (black) walls, low light, stark modern furniture, not easy to shoot.

First, I used a wide angle lens (16-35 on a full frame camera). That got me the ability to get it all in, as well as freedom from focus and shake worries (the wider a lens, the easier it is to shoot at low speeds and the easier it is to focus on everything). I used a tripod, so the low speeds did not matter, but the focus all the more.

Available light was dull. Like this:

Berlin Night Club in Oakville, using simple light

Night Club using simple light

So I got out my bag of tricks:

  • A Pocketwizard on the camera
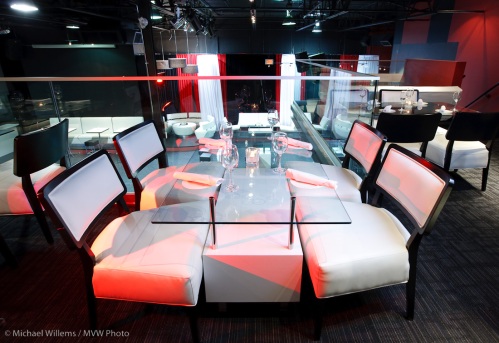
  • Four small flashes with pocketwizards: for the next shot I used one 430EX through a white umbrella and one direct, equipped with a red Honl Photo gel.
  • I set the flashes’ power levels manually, using simple trial and error and the histogram.

Now I got this:

Berlon Nightclib using two flashes

Nightclub using speedlights and gels

Isn’t that much more interesting?

Same here in the following picture. First, with just the flash in the umbrella:

Not bad, but a bit like a furniture catalog. How about with a nice red gelled flash also:

More like a club where things are happening.

The following shows part of my setup for another part of the room, with alcoves:

Light setup with multiple=

Which, when properly positioned, got me pictures like this:

Nightclub lit with multiple=

Look at the stool’s legs: do you see how much difference that red accent makes?

Later still I used a white umbrella plus a red gelled 430, a Honl Folies Purple gelled 430EX in the dance cubicle upstairs, and a red plus an egg-yellow gelled 430 as well. All of this done with Honl gels and Honl speedstraps.

Before:

..and after:

Of course some scenery needed no gels to pretty it up, just one bounce flash:

I did have to move her to the right where the bar had a small ceiling area to bounce off.

Flash Modifiers, when to use: 1 – The Fong Thing

Some photographers love the Gary Fong lightsphere because it throws light everywhere and makes it simple to shoot. Others hate it because it throws non-directional light, meaning “no art”.

They are both right. Every modifier has a range of situations where you use it, and a range where you do not use it. The key is not just to learn how to use a modifier, but it is to learn when to use it in the first place, and when not to.

So the Fong Lightsphere is a modifier that:

    1. You put on your flash
    2. Aim upward
    3. Use without the dome if you have a white ceiling; else use with the dome (the round side down).
    4. And which then throws the light everywhere.

      And I mean everywhere. Left, right, up, down, front, behind: photons bathe the room. And reflect off anything that can reflect. Which is the Lightsphere’s benefit.

      It is therefore good to use in situations where:

      1. It is dark.
      2. It is impossible to find a good bounce wall/ceiling behind you. A good wall/ceiling is almost always preferable if you can find it.
      3. You are looking for anything to get light into the room: you are not interested in artistically shaping light.

      Like in this unedited image of the Wendel Clark restaurant I shot yesterday:

      Using a Gary Fong Lightsphere

      Using a Gary Fong Lightsphere to light a restaurant

      Note that I was using my Gary Fong Lightsphere on a separate flash in my left hand, aimed at the ceiling. I was using TTL to fire that flash from the one on my 1Ds camera. Yes, you develop strong hands as a photographer – that, and arthritis.

      That off-camera use is a key technique for me: I often like to use the Fong off-camera to give me at least a little bit of shaping.

      Here’s another picture from that shoot:

      Wendel Clark Restaurant lit with an off-camera Lightsphere

      Using a Lightsphere

      So while as you all know I normally much prefer the Honl lightshapers – they allow me artistic control over where the light goes – “trendy venues” is a prime case where I use the Fong Lightsphere.Because Trendy Venues have no simple walls or ceilings, and those that there are tend to be black. So you need to bounce those photons off anything that wiull reflect them, anywhere in the room. Enter the Fong Thing.

      What does the Fong Thing look like: Here’s me with one on the camera.

      Why would you use flash outdoors?

      So why would you use flash outdoors during the day?

      Sometimes it is obvious: to fill in shadows on backlit subjects. Or to soften hard shadows. But sometimes you do it for more artistic reasons.

      Let me illustrate this with a shot taken during the Get Out and Shoot run we did in Toronto early this week – the workshop I wrote recently.

      Imagine you are shooting someone – me, say – on a bright day, but in a spot where I am in the shade against the shady side of a grey building. Before you know it you get a dull picture: grey and low-contrast on all counts: blaah.

      So that’s when you bring out the flashes. Say, two remote “slave” flashes, fired by a “master” flash on the camera. One slave to the camera’s left, shining into a Honl reflector, and aimed at the subject’s face, to add bright light to the subject. The second flash is equipped with a Honl Speedstrap and on it, a green gel, and this flash is aimed at the grey wall behind the subject to make it less grey.

      Now you get this:

      Outdoors Flash

      Outdoors Flash Used During the Day

      You will agree, I hope, that this is a lot better than it would have been without the help of flash. Even, no, especially, on this bright day.

      Want to learn about all this stuff: read here of course, but also: join me for training.

      (Thanks to colleague photographer Rob Corrado for the picture)