Questions

Reader questions today:

I was searching your blog to see if you had anything with output sharpening for printing from LR2 and did not come up with anything. I have read or been told at one point that you want to do some over sharpening of your images when you go to print them to compensate for the process of putting ink to paper and having that ink spread?

Is this something to worry about, and if so any suggestions for settings?  I have the basic LR2 sharpening output features and the mogrify add on has some output sharpening options as well.

There are two reasons you may need to sharpen images.

  1. “In-image sharpening”: a DSLR has an anti-moiré filter in front of the sensor which unfortunately blurs the image a little. A little sharpening (edge detecting) afterward helps bring back the optimum sharpness. Usually not a big worry.
  2. Output sharpening: Plus, when you decrease an image in size – e.g. to bring back a full-size images to 1024×768 size for your iPad, or to 800 wide for an email – you lose sharpness. Sharpening brings back the original sharpness.

Good news: if you use Lightroom, this is taken care of.

If you want additional in-photo sharpening (type 1), select this in DETAIL in the Develop module.

And if you want output sharpening (which as you correctly surmise, you do!), just select “standard” when producing your output or print (and select what the image is for). It is in the export and print dialogs. Lightroom automatically takes care of the right amount of sharpening, given the output parameters. This is really very clever. In the Photoshop world this was a lot more work.

Another thing I have heard was that for guys like me who don’t have an expensive printer at home, you can download or get printer profiles form local printers and adjust your images accordingly so you can see how they will turn out from their printer.  Any experience on this subject.

Yes, and it is true. For anyone. Download, install, and use the right printer profiles for whatever printer and paper combinations you use. Check with your printer and your paper manufacturers!

Printing is black magic – but once you have a certain print type –  printer – paper combination sorted out it will always work.

iPad Sort Tip

Do you use Lightroom on a Mac? And have an iPad? And want to sort the images you see on your iPad?

Perish the thought.  Unless you also want to use iPhoto in parallel to Lightroom (which makes little sense), that is difficult.

But it is possible.

And you do it as follows. If you are an advanced user, that is!

  1. Install EXIFTOOL (Google it. It’s a great little command line tool that you will need for this).
  2. In Lightroom, make a collection, add your selected photos to that, and sort them any way you like.
  3. Now click the A-Z icon at the bottom to reverse the sort order. (Apple sorts the images in reverse order for some odd reason!)
  4. Export to a folder (While we are at it, use the maximum file size the iPad accepts, 2304 x 1536 pixels)
  5. In the export dialog, change the filename to a number, instead, e.g. a number from 00 to 99. You can select this (rename file) in the export dialog.
  6. Now open a command window, go to that folder.
  7. In that folder, type something like exiftool -alldates=”2010:08:22 13:00:00″ *.jpg
  8. Delete the *-original” files from that folder
  9. Now move that folder to the place where you have told iTunes to sync photos to your iPad (if you tell iTunes such a folder, all folders and photos you put within that folder will be synchronized with the iPad.)

That is all.

That is all? You need to be a computer scientist for this?

Yes, it is a little involved – that’s thanks to Apple mandating that no sorting must be done unless it’s by creation time. or unless you use iPhoto so you manage your photos twice. Or give up using Lightroom, which is what Apple really wants you to do, I suspect.

But at least you now know there is a workaround. And it works like a charm.

Lightroom Tips

As a photographer you need Lightroom, or perhaps Aperture if you are so inclined.  And Lightroom 3.0 is out, leading me to give you a couple of quick tips.

  • In the develop module, ^C (control-C or on a Mac command-C) copies selected settings (you can indicate which ones) from a photo and then ^V pastes them to another photo. This is often the way I synchronise settings between a few photos. Quick and simple, and unlike some of the other settings, not confusing.
  • Always type “G” to go back to grid view, “E” to go back to loupe view; and type “D” to go back to the develop module. Using the mouse all the time for this takes too much time.
  • “L” dims, or turns off, the lights. (Keep pressing and it toggles).
  • “F” goes full and even fuller screen. (Keep pressing and it toggles).
  • “Z” toggles the zoom view (a useful shortcut to know).
  • Use “Solo mode” on the panels on the left and right (right-click to select this). That way you avoid everything opening at once.
  • The new develop presets are really good – try them!

Also, remember to set the metadata and develop presets. These are well hidden – I regularly take forever to find them. But while the User Interface here is infuriatingly confusing, you only have to learn it.

  • Create a metadata preset that you can then use when you like and even automatically apply when importing. Do this as follows: Library – Metadata – Edit Metadata Presets – (make your changes, e.g. enter copyright data) – Save current settings as new preset. Call it something like “Joe Metadata Standard”.
  • Create a develop preset that you can then use when you like and even automatically apply when importing: select a photo, go to the develop module, make any changes you need (eg set camera calibration to CAMERA Standard, not ADOBE Standard) – and then use menu functions DEVELOP – NEW PRESET. Call it something like “Joe Develop Standard”. You will now see your new preset in “User Presets” in the left panels. To make changes to your preset, right click on it here and “Update with current settings” after you make the changes to the image.

Learning this application is sooo worth it.

Can you use a Canon 7D at high ISO?

Yes you can. Especially when you use Lightroom 3 noise reduction.

I want to show you this picture again – a repeat, but now with full sized crops and re-edited with Lightroom 3’s magic noise cancellation.

Here is the cat, shot with my 7D and a 50mm lens set to f/2, at 3200 ISO. And.. pushed 1.67 stops.

Meaning I underexposed, and increased exposure on the computer. This results in the worst noise you will ever see, much worse than you will see when using the camera properly.

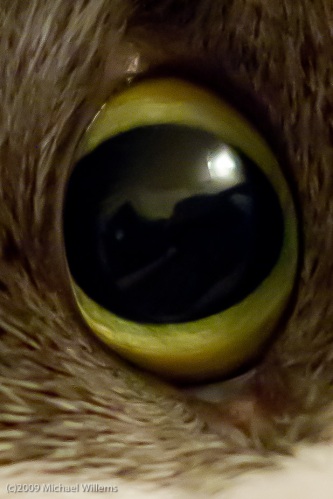
Here is a detail from it, in the original size crop with no noise cancellation. Click to see it at real size.

Cat's eye with noise, shot by Michael Willems at 3200 using a Canon 7D

Cat's eye with noise

Now we apply 90% noise reduction. Magic:

Cat's eye with noise reduction, shot by Michael Willems at 3200 using a Canon 7D

Cat's eye with noise reduction

The finished picture:

Cat with noise reduction, shot by Michael Willems at 3200 using a Canon 7D

Cat with noise reduction

So do not be afraid of high ISO when you need it. It’s fine. Relax.

Le Chat, etc: Montréal ce soir

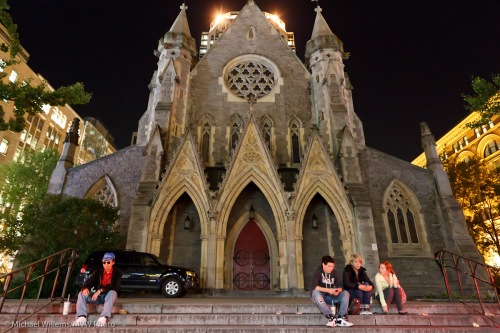
A quick walk through Montréal. 32-12800 ISO and Lightroom noise reduction.. Wow. Wow. And wow. Both Montreal and the low noise performance:

Montreal church, by Michael Willems

Montreal church, by Michael Willems

Montreal Wall, by Michael Willems

Montreal Wall, by Michael Willems

Montreal, by Michael Willems

Montreal

And my favourite:

Le Chat, photographed by Michael Willems

Le Chat (en Montréal)

All this shot handheld with a 1D Mark IV and a 16-35 f/2.8 lens. At ISOs up to 12,800, and with Lightroom 3 noise reduction applied.

1600 is the new 200

I am now using Lightroom 3, having upgraded from 2.6. Strongly recommended. Very strongly: worth every penny of the $99 upgrade fee.

If you do not yet know about Lightroom: you need it (or if you use a Mac, Aperture, the other option. For PC, Lightroom is the only option). The apps organize, keyword, rate and find your files, or rather allow you to do so; and they allow you to do 99% of the editing you’ll ever need, non-destructively and quickly. Much more quickly and conveniently than in Photoshop, which in spite of its name is aimed at illustrators.

Lighroom 3, which I will review in more depth soon, is superb. The major function is the noise reduction. 1600 ISO is the new 200. It is magic.

Look at this image of a student at the Henry’s imaging show recently (and I know you are reading this!). Shot at 1600 ISO with the Canon 1D Mark IV. Click on the image to see it larger:

An image shot with off-camera flash at 1600 ISO

An image shot at 1600 ISO

Superb quality!

But the original was more noisy, especially since I had to push it half a stop (yes, it was a dark room).

Here is a piece of that image. When you click it, you see it at its original size.

An image shot with off-camera flash at 1600 ISO, before Lightroom noise reduction

before noise reduction

Now look what happens when I apply some noise reduction:

An image shot with off-camera flash at 1600 ISO, after Lightroom noise reduction

After Lightroom noise reduction

And that is just after dragging the slider,. I could play with the parameters to make it even better.

Magic, pure magic. I shall be shooting tomorrow’s Bat Mitzvah party muchly at 1600 ISO, I imagine.

New firmware for Canon 7D

There’s new firmware for the 7D, here: http://web.canon.jp/imaging/eosd/firm-e/eos7d/firmware.html

I’ll update mine this morning.

UPDATE: I just updated it. All well, but note, the upgrade reset my image number to 1, which I do not like. (NOTE: never use “do not import suspected duplicates” to ON in Lightroom, since LR appears to look just at the file number. This has cost me images!)

That wired effect

Here’s a picture I just took of my favourite patient model. I used some technique to get that dramatic “Wired” effect:

The way I made this picture:

Camera:

  • Camera: Canon 7D with 50mm f/1.4 lens
  • Set to Manual, 1/125th sec, f/8, 100 ISO

Flash:

  • Multi-flash TTL with one on-camera and two off-camera flashes.
  • One “A” Flash on the camera (580 EX) as fill flash and “commander”;
  • The main lighting was rim lighting: two 430 EX flashes either side of the model, slightly behind, set up as “B” flashes.
  • I was using a 1:8 A:B ratio.
  • The 430 flashes were each equipped with a Honl 1/4″ grid, to stop their light from hitting the entire room.
  • Flash compensation -1 stop to avoid overexposing the rims (this is common when your main flash lights only a small part of the picture).

Post:

  • And finally, I desaturated the colours in Lightroom: Presence +15, Vibrance -20 and Saturation -40. I also did a version where I desaturated only red and orange, and increased sharpness, which is the usual technique.

Try it yourself, or come to our two-day Light workshop 10+11 April to learn exactly how to do this.

Lightroom Tips

Two Lightroom performance tips for you today:

  • Optimize your library regularly. On a Mac, go to “Lightroom”, “Catalog Settings..”, and select “Relaunch and Optimize”.
  • Increase your Camera RAW Cache size to at least 10 GB (if your hard disk has that much size available). On a Mac, go to “Lightroom”, “Preferences”, and set Camera Cache size to 10 GB or more.

This will keep your Lightroom installation working more quickly.