Digital SLR Gotchas: LCD

The LCD on your digital SLR is fabulous.

But do not use it to judge exposure, for one main reason: it is not objective. Its apparent brightness is affected by ambient light as well as by your LCD’s brightness settings, and this can easily lead you astray. I see this all the time in classes. “Why is my camera overexposing every shot?” is usually answered by “it’s not, but you have set your LCD to full brightness”.

My tip:

  1. Expose well (use the tips on this blog; learn exposure compensation; learn to use the spot meter).
  2. Use the histogram to judge whether you got it right.
  3. When using the LCD, use a Hoodman Hood Loupe.
  4. Set the LCD to “average” brightness.

I like to “expose to the right” – your preference may be different. Either way: do not judge a photo by the LCD on the back of your camera.

Stop Press: Rogers screws customers

Oh sorry, that is not news. Cable and mobile telephony provider Rogers Inc, a company so close to its government buddies who provide them with the near-monopoly they enjoy that when a Rogers president dies, every living past and present Canadian prime minister attends the funeral, always screws their customers!

This time, Apple a few days ago sent an email about the iPad. It mentions the Rogers rate of $20 for existing iPhone data customers. So I order a 3G iPad. And then days later, Rogers say that rate is a typo. Actually it’s $35 for a few GB. And there’s no break for existing clients who already pay $60 for 6GB on the iPhone. Even if they only use a fraction of that 6GB.

My cell bill is never less than $125. Why we accept being raped (figuratively) by people who to me seem simple criminals is beyond me. But the outcry on the Rogers blog and other publications and even the Globe and Mail leads me to believe that they will recant. We shall see.

In any case, the iPad will be a major item for photographers: I think there will be entirely new, innovative ways to share and show off and use photos.

Flash: TTL or manual?

Do I set my flash to TTL or manual?

Both.

TTL (fully automatic flash measuring) is a revolution, and you should use it whenever:

  • The subject moves
  • You move
  • You have little time
  • You use one flash on camera
  • You use multiple flashes but they are within eyesight of each other

Use it as is (your flash shows “TTL” on the back display), and do not forget to use Flash compensation to adjust to taste (or when shooting dark or light subjects).

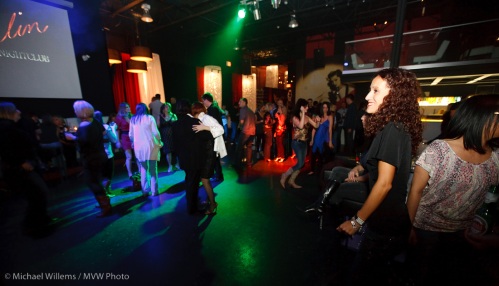
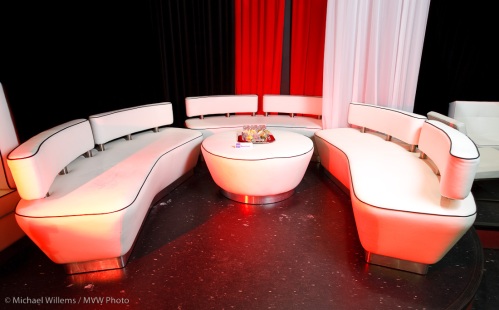
I used TTL here, Sunday night (with -2 stops flash compensation, or it would have been too bright):

Berlin Nightclub in Oakville

Berlin Nightclub in Oakville

Manual (your flash displays “M” at the back and you set the power level to 1/1, or 1/2, 1/4, etc) is useful in cases almost opposite to the previous, namely:

  • You and your subject are stationary
  • Things are predictable and you want full control
  • You have time to meter, try, and iterate
  • You use multiple flashes and they cannot see each other
  • You use Pocketwizards

You can even mix: use TTL for most flashes but fire small accent lights using Pocketwizards and manually set flashes.

Earlier that same Sunday night, when I had time, I used three speedlites set to manual and fired by Pocketwizards, here:

Berlin Nightclub in Oakville

Berlin Nightclub in Oakville

You can probably see I also used some Honl gels: one red and one purple. And one flash was zoomed in to light the picture.

A good photographer knows both TTL and manual. Practice with both, and make them “your own”.

Take care of your memory.. and memories

A regular reader asks:

Good morning Michael,

I’m going on a 2 week vacation soon, and am thinking about how I manage the cards to keep my risk as low as possible. I plan on nightly backing up the cards to a laptop and to usb sticks. I won’t be deleting any pictures off the cards until I get home (if at all possible). This way I should have 3 way protection. A little crazy, but we’re dropping 10k into this. I don’t want to lose anything. My big worry would be losing the camera bag and laptop due to theft. The usb sticks will always be kept on me or in a different location at least.

Anyway, I’ve a question about handling memory cards. I have always left them in the plastic containers they came in and then put them into slots in my camera bag. I find that cumbersome, but I don’t want to damage them. These are SD cards if that matters. Is it okay just to forget about the plastic cases and tuck the cards into the elastic slots? What about card cases? Do you have any recommendations?

Thanks for any thoughts. I’ve been enjoying your down to earth photography discussions.

Thanks for the compliment, and yes, I have some thoughts:

  • First, the idea of backups makes a lot of sense to me. Things fail and get stolen. I always keep backups, multiple backups if possible, while travelling.
  • If a laptop is big or expensive, consider a Netbook and external drives. A netbook is useless at most things but great for things like backing up pics from an USB-mounted card to an external drive or two – and they’re cheap.
  • I like 4 GB cards. Why? Because they avoid “too much on one card” and because a 4GB card fits in its entirety onto a DVD! Then you can burn DVDs (or go to a camera store to have it done) and mail yourself a copy at home. That’s real safety. And a DVD costs just a few pennies.
  • Cards in the bag without cases is fine – I do that too, as long as the bag is not a flexible type you will sit on. Camera stores sell little card-wraps/containers; many of these have a clip you can use to secure the container to your camera bag. This is an essential step.
  • After backing up a memory card, before reusing it always format it – and in the camera. It does not have to be a low-level format – but I do that too every now and then, just to keep the card fresh.
  • Avoid 800 pictures of Rome on one card. Someone grabs your camera: the pictures are all gone. I swap cards regularly whether I have to or not.

Finally: shoot RAW so you can save sub-optimal pictures, and bring a lot of memory. Your $10k is ephemeral: it is gone as soon as the trip is over – but by securing the trip in pics that $10,000 becomes a lasting investment. That’s worth some extra memory cards!

Party time

Well, what I mean is: when there’s a party or an event. I am happy to shoot it.

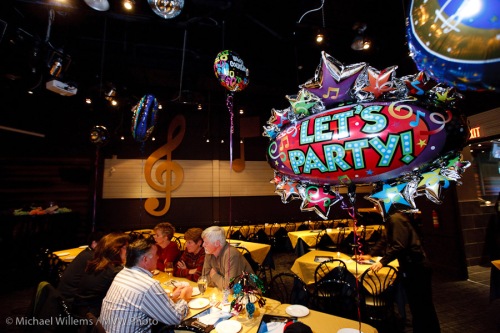
Party Time

Let's Party!

The problems are always the same: black walls, low light, and great “inverse square rule” distance differences.  A steady hand, high ISO, fast lenses, and innovative flash modifiers, combined with deep camera and flash knowledge, plus above all, experience, get you nice pictures.

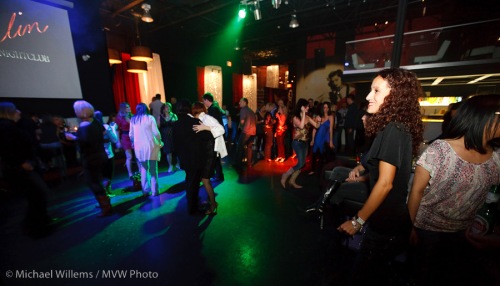
Nightclub

A nightclub shot by low light

My typical settings would be:

  • Camera on manual
  • 1,600 ISO, 1/30th second, f/2.8
  • -2 stops flash compensation.
  • A reflector behind the flash

At least as a starting point.

If you need a photographer to shoot your event: you know where to find me!

Fun with Gels 3

I shot a night club yesterday.

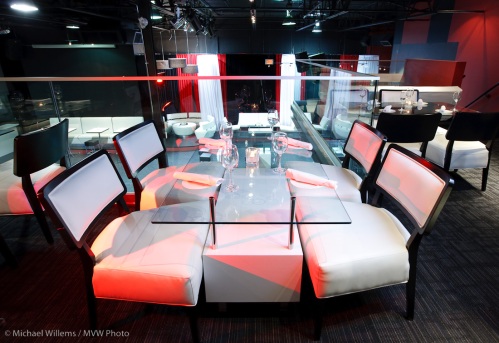
Dark (black) walls, low light, stark modern furniture, not easy to shoot.

First, I used a wide angle lens (16-35 on a full frame camera). That got me the ability to get it all in, as well as freedom from focus and shake worries (the wider a lens, the easier it is to shoot at low speeds and the easier it is to focus on everything). I used a tripod, so the low speeds did not matter, but the focus all the more.

Available light was dull. Like this:

Berlin Night Club in Oakville, using simple light

Night Club using simple light

So I got out my bag of tricks:

  • A Pocketwizard on the camera
  • Four small flashes with pocketwizards: for the next shot I used one 430EX through a white umbrella and one direct, equipped with a red Honl Photo gel.
  • I set the flashes’ power levels manually, using simple trial and error and the histogram.

Now I got this:

Berlon Nightclib using two flashes

Nightclub using speedlights and gels

Isn’t that much more interesting?

Same here in the following picture. First, with just the flash in the umbrella:

Not bad, but a bit like a furniture catalog. How about with a nice red gelled flash also:

More like a club where things are happening.

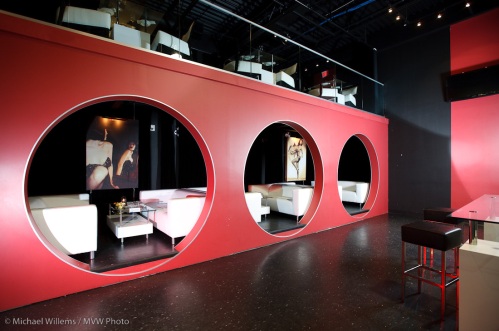
The following shows part of my setup for another part of the room, with alcoves:

Light setup with multiple=

Which, when properly positioned, got me pictures like this:

Nightclub lit with multiple=

Look at the stool’s legs: do you see how much difference that red accent makes?

Later still I used a white umbrella plus a red gelled 430, a Honl Folies Purple gelled 430EX in the dance cubicle upstairs, and a red plus an egg-yellow gelled 430 as well. All of this done with Honl gels and Honl speedstraps.

Before:

..and after:

Of course some scenery needed no gels to pretty it up, just one bounce flash:

I did have to move her to the right where the bar had a small ceiling area to bounce off.

Reader question: Focus

RG, a regular reader, asks:

I just still struggle getting my subject in sharp focus.

I shoot in Auto Focus mode on my Canon Rebel XSi (usually in Program Mode). I manually select my “red” indicator and try my best to focus on what I want sharp. But what do I focus on when my subject doesn’t fall neatly on one of the AF points? I tried to pick the nearest one to my subject — sometimes it comes in focus, sometimes not.

If I am taking a portrait of two people’s faces and they are cheek-to-cheek — sometimes one face is sharp while the other is not! Annoying! In that case, where do I place the red mark on?

Great questions. And the answer comes in three parts: motion blur, focus blur, and depth of field.

Let me start by saying “it’s not just you”. Everyone struggles with focus. I do, too.

  1. One important reason is that we are more critical today than in the past – we zoom in. Take your blurry picture and print it at 4×6 and it will probably look just great!
  2. We take many more pictures in low light, where we would not have tried in the past.
  3. We have two distinct kinds of blur: focus blur and motion blur. They are easy to confuse.

So then let’s start with motion blur. Your first picture’s unsharpness was mainly due to motion blur: it’s a shaky picture. It was taken at 1/30th at f/1.8 on a 50mm lens. The 50mm lens works like an 80mm lens on your Canon Digital Rebel. To get sharp pictures, a rough rule of thumb is: “stay at one divided by the ‘real’ lens length – preferably twice that”. So you should be at 1/80th second, maybe even 1/160th second, when handheld. 1/30th is  pushing it. No problem trying, but steady the camera, lock it onto your face, don’t breathe, and take the picture ten times, then pick the sharpest one. Or… use a tripod. Or go up to a higher ISO value to increase the shutter speed.

Now to focus blur. The second picture is blurred mainly due to focus: the closer part of the girl’s clothing is sharp while her face is not. That could also be motion (her motion this time – not yours; she is turning her head) but it is to a large extent it is focus.

You are focusing with one focus point: this is always the way to do it! But what if there is no focus point where your subject is?

How, in other words, do you take a picture like this?

Selective focus

Focus-recompose-shoot

Actually that is quite simple and I want you to reproduce that picture now. Use a technique called “focus – recompose – shoot”:

  1. Select a focus point near the subject;
  2. Aim that focus point at the subject;
  3. Focus by pressing half way down. Wait for the beep that indicates “in focus”. A green dot appears too, at the same time.
  4. Hold your finger there – do NOT let go! But also do not push all the way down.
  5. Now recompose the picture (while still holding your finger down).
  6. Now finally push down to take the picture

Hah – your hand is now still sharp, since pushing half way and holding your finger there locked the focus distance, until you either let go or push down.

Finally to depth of field. What if you want more than one thing to be sharp?

  1. Use Aperture mode (Av), and select a not-too-small Av Number. f/1.8 will give you very very shallow, selective, depth of field. f/5.6 gives you much more sharpness (but slower speed); f/16 and much of your picture is sharp (but now even longer shutter speed so you must use a tripod and tell people to not move).
  2. Aim at a point in the middle, So if you have to shoot three rows of hockey kids, focus on a kid in the middle.

So now you know how to avoid blur, how to focus accurately, and how to get enough in focus.

All you need to do know – and you know what I am going to say: practice!

Manual

Interesting word,”manual”.

And one where a bit of disambiguation is called for, I think. I quite often hear students say “I am on manual”, or even “I am on automatic”, without understanding what this means.

OK, I am repeating myself – but I think I should, because this is such a misunderstood subject – and so often.

There are, you see, many meanings of “manual”, and they are not at all the same – not even close. They are in fact not even related. First, manual refers to a handbook, or even a hand.

And in cameras, we have:

  1. Manual exposure mode. This is the big dial on your camera. This turns the setting of your camera’s Aperture and Shutter Speed to manual (you set them, not the camera). But note, flash is still fully metered!
  2. Manual focus. This means turning the lens yourself to get accurate focus.
  3. Manual focus spot selection. This means you select the focus spot for autofocus – not the camera.
  4. Manual flash power. This  means no TTL metering occurs, but instead you set the flash to some power level you determine (like 1/4 or 1/32nd)
  5. Manual flash zoom. This means the angle the flash distributes its light across: it is normally automatic but you can also set it by hand (“35mm”, or “70mm”).
  6. Manual ISO (as opposed to “Auto”)
  7. Manual White Balance (e.g. a predetermined mode of degrees Kelvin,like 3200K).

None of these have anything whatsoever to do with any of the others. They are independent and unrelated. So never say “manual” without saying manual what. A sentence like “my flash is fixed power, because my focus spot selection is on manual” is meaningless, as is “autofocus does not work because my metering is on manual”.

Flash Modifiers, when to use: 1 – The Fong Thing

Some photographers love the Gary Fong lightsphere because it throws light everywhere and makes it simple to shoot. Others hate it because it throws non-directional light, meaning “no art”.

They are both right. Every modifier has a range of situations where you use it, and a range where you do not use it. The key is not just to learn how to use a modifier, but it is to learn when to use it in the first place, and when not to.

So the Fong Lightsphere is a modifier that:

    1. You put on your flash
    2. Aim upward
    3. Use without the dome if you have a white ceiling; else use with the dome (the round side down).
    4. And which then throws the light everywhere.

      And I mean everywhere. Left, right, up, down, front, behind: photons bathe the room. And reflect off anything that can reflect. Which is the Lightsphere’s benefit.

      It is therefore good to use in situations where:

      1. It is dark.
      2. It is impossible to find a good bounce wall/ceiling behind you. A good wall/ceiling is almost always preferable if you can find it.
      3. You are looking for anything to get light into the room: you are not interested in artistically shaping light.

      Like in this unedited image of the Wendel Clark restaurant I shot yesterday:

      Using a Gary Fong Lightsphere

      Using a Gary Fong Lightsphere to light a restaurant

      Note that I was using my Gary Fong Lightsphere on a separate flash in my left hand, aimed at the ceiling. I was using TTL to fire that flash from the one on my 1Ds camera. Yes, you develop strong hands as a photographer – that, and arthritis.

      That off-camera use is a key technique for me: I often like to use the Fong off-camera to give me at least a little bit of shaping.

      Here’s another picture from that shoot:

      Wendel Clark Restaurant lit with an off-camera Lightsphere

      Using a Lightsphere

      So while as you all know I normally much prefer the Honl lightshapers – they allow me artistic control over where the light goes – “trendy venues” is a prime case where I use the Fong Lightsphere.Because Trendy Venues have no simple walls or ceilings, and those that there are tend to be black. So you need to bounce those photons off anything that wiull reflect them, anywhere in the room. Enter the Fong Thing.

      What does the Fong Thing look like: Here’s me with one on the camera.

      Blog Tips

      A few tips for blog-followers:

      1. I blog every day. Um.. every day, yes. So that means I am likely to have written about an issue in the past. Always try to search – for your convenience, the search field is now at the top, on the right.
      2. Subscribe to this blog (also on the right, if you scroll down just a bit), so the blog will automatically email you when I publish a post. That way you do not have to remember come here, which you may forget.
      3. Try to look at categories. Or at keywords. Scroll down and select category or enter keyword. You may see patterns, and reading multiple articles can shed real light on a subject.
      4. Send me questions. I try to answer them all, often on the blog.

      And “off-blog”:

      • Take a few workshops or courses. As you know, apart from shooting (for newspapers, corporations, and so on) I teach photography. Both on my own and with colleagues like the incredibly talented Gregory Talas and Joseph Marranca, aimed at more advanced users; and at Henry’s School of Imaging, aimed at beginners. Photography is easy to learn now. Yes, it is still work – perfecting anything takes time – but it is much easier than in the film days.
      • Joseph and I are doing a full-day “advanced flash” workshop in Mono, Ontario (an hour north of Toronto) on May 30: see the details here and sign up today to advanced your Flash knowledge.

      I hope to continue to help you all for many more years. Any raves are welcome, too, by the way (as are tips in the tip jar).

      And you can really help by spreading the word: the more people here, the more useful this gets for everyone.

      But most of all, enjoy. This blog, but especially, photography.