About A Crop

Yesterday’s post prompts me to talk a little about cropping, today. After all, cropping your picture (either in camera or, more commonly, afterward, in post) is an essential step to making the image what it is.

You crop in order to:

  • Fit to a certain aspect ration (say, 5×7).
  • Get rid of “stuff” that doesn’t belong – i.e. to simplify.
  • Get in close.

Famous photojournalist Robert Capa once said: “if your pictures aren’t good enough, you’re not close enough”. He had a point.

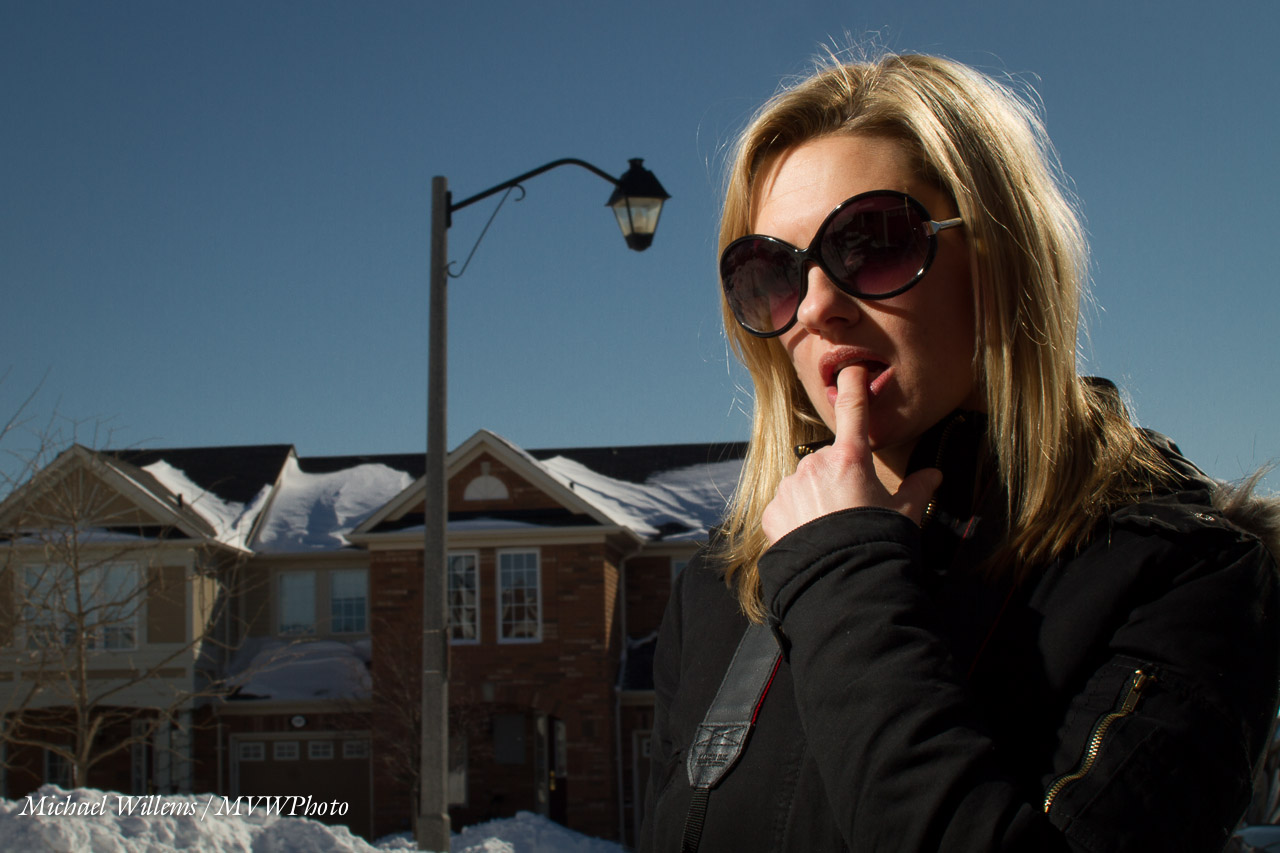
Consider these three images from the other night: the original, and two crops:

There is no “right” or “wrong” in these crops. But I would argue that the third image, i.e. the closest crop, is the most powerful version. They are certainly all very different images, that tell different stories (or raise different questions).

You can crop in camera, or shoot a little wide, to leave space for cropping later (that’s why the Good Lord gave you all those megapixels). I tend to often shoot just a little wide in the camera, so I can creatively crop later.

Exercise: crop your recent images really tight and see what you end up with. Yes, you can cut through heads, as I am doing above.


All’s fair in love and war… and art?

There is a controversy over the image that won the World Press Photo award. The photographer did some desaturating: read about it here.

Personally, I think that in a press photo, changes are allowed only if they do not change the nature of the photo (i.e. cropping, exposure adjustment, white balance are OK), or if they bring back the image to what a person would have perceived. But when the adjustment is done to make a political point, as seems the case in the above example, I am against it.  There is no well-defined line, so it is a tough call, but if I did that for a press photo, I would not work in press again.

However, in art, all is allowed. The question there is: is it OK to still call yourself a photographer, when you do such trickery?

Like this image from a few hours ago, showing, um, me:

The original, “actual” image, was this:

But then I added some Lightroom effects to desaturate the image, and increase the contrast. Cropped, it looks even better (can you tell, I rather like negative space, and the rule of thirds?):

View at original size to get the idea. Nice, no? And very fashionable. This desaturate thing, like HDR,is all the rage.

But if I do this, am I still a photographer?

On balance, I think so. If I do not overdo it, yes. If the original is still recognizable in the end product, yes. If I don’t do it every time, yes. If I do what can be done in camera, in the camera, yes. After all, photographers have always spent lots of time in the darkroom. Ansel Adams spent more time in the darkroom than in nature. And in the past, you would have chosen a film to give you the effect you wanted, and filters.

So I think that you can do dramatic post as long as:

  1. You do it well.
  2. You do not overdo it.
  3. You could not have done it in camera.
  4. It’s not journalism.

What do you think?


TOTD – Tips Of The Day

Tip: If you have an iPad and like showing your pictures, get Foliobook. Now. This app allows you to present pictures that you want, as a portfolio or slideshow, the way you want. And to create a front page. And your own order and categories. It is everything the built-in viewer app isn’t. $12.99. And no, I do not get commission.

Tip 2: View images on this here blog as the original large size. To do this, click on the picture, then click on the “Full Size Is…” link, and then if needed click on your computer’s “+” magnifying glass cursos. That is the only way you see what an image is really like. Small kills. So this example (click here) is what you see when you do that.


Bright pixels are…

…sharp pixels.

Look a this image:

Dark, but as you know, we can rescue dark images in Lightroom or Photoshop. Especially if, as here, we shot them in the RAW format – which you really always should do.

So, into Lightroom, notch the image’s exposure up a couple of stops, perhaps play with “Whites” and “Shadows” a little, and done! Right?

Yes. But.

While we successfully increased the level of the dark parts of exposure, we also at the same time increased the noise (“grain”, if you will). Noise, after all, is like cockroaches: it hides mainly in the dark. Look at a small detail:

See? Grainy.

Compare that with the next image I shot, which at first looks just about the same, at least in terms of exposure – I shot this one at a slower shutter speed:

But this one I exposed well – I did not have to electronically increase the exposure, so I did not increase the noise. So a small section of this image looks like this:

If like me you were an engineer, you would say that it has a “higher signal to noise ratio” than the previous, electronically doctored, image.

So that is why we try to expose as correctly as we can, rather than relying on RAW to fix it for us later.

(You can even expose “to the right”, i.e. expose too brightly, as long s you do not lose detail in the bright areas. If you manage to do that successfully, you can pull the image down later, thus increasing the signal to noise ratio. I have written about this here before, look it up).


Hi-ho, hi-ho

Hi Ho… Hi Ho, high ISO we go!

Every now and then, we need to take stock of where we are in tech development. I feel that this is such a moment. We have seen a gradual increase in usable ISO over the years, and it feels to me like today it is time to re-evaluate the ISO settings we use, and indeed to increase them.

High ISO leads to noise (“grain”), and should be avoided unless necessary. I recommend the following “starting points”, therefore:

  • Outdoors or tripod or studio: 200 ISO
  • Indoors, even with flash: 400 ISO
  • Difficult Light: 800

And you increase as necessary.

So what has changed?

With today’s modern cameras, you can go higher, that’s what. Look at my Canon 1Dx just now, at 3200 ISO:

(3200 ISO, f/2.0, 1/320th second, with the 50mm f/1.2L lens).

Looks good eh. Even fully zoomed in, it looks great, straight out of the camera (no noise cancellation done):

Another example:

Again, very useable at 3200 ISO straight out of the camera.

Even on older cameras like my crop factor Canon 7D:

Not as good at 3200 ISO, you can see some grain if you look carefully, but still, entirely useable, and better than a picture that is motion-blurred.

Now, a note. Willems’s Dictum: bright pixels are sharp pixels. So if you want good sharpness and low noise, avoid underexposing. Expose brightly!

Anyway, so what is the conclusion? Whence the step change?

As of today, if you are using a modern camera, my recommendation is as follows:

  • Outdoors or tripod or studio: 200-800 ISO (i.e. feel free to go up to 800 if you need).
  • Indoors, even with flash: 400-1600 ISO (i.e. feel free to go up to 1600 if you need).
  • Difficult Light: 800-3200 (i.e. feel free to go up to 3200 if you need).

And in all cases, go even higher if you really need.

This now means your flashes are two stops brighter. You can often shoot with speedlights where strobes were needed before. You can use higher ceilings to bounce off. You can even shoot weddings without flash. Amazing. Technology is changing photography.


Never do this.

This. Selective colour. As I mentioned here before: a sin, a never-do, a teary clown: a cliché.

So why did I do it in that image I shot yesterday?

Because to every rule, there is an exception. Don’t ever let anyone tell you to “always” or “never” do something. Always or never means “Always or never – EXCEPT if you have a good reason in your own mind to break the rule”.

In this case, the image worked best in B/W, but the cool iPhone headset in luminous pink was too good to not show in colour. OK, selective colour then, and damn the torpedoes.

How:

  1. Go to the DEVELOP module in Lightroom
  2. Enter the HSL section and select S (Saturation)
  3. Drag down all colours to zero, The with the pick tool, select the handset and drag UP. (Red and Magenta, in this case).
  4. Now with the BRUSH tool, set saturation to zero, and wipe out any saturation in the rest of the image (face, hands, and so on).

Took me just a few seconds. Which is why I can try it out, and then decide perhaps the B/W version is better after all?

You judge. And remember: never take anything for granted in how you shoot. Always be ready to experiment. That’s how you get unexpected results. But also, never be afraid to throw out your experiments.


Black is black….

….except when it isn’t.

When doing post-production, make sure that the areas of your image that should be totally black are in fact totally black.

Take this image.

The photographer is black. But is he?As you know, a RAW image has much colour space, so are you sure? Go to the histogram in Lightroom’s Develop module, and click on (or hover over) the little arrow on the top left.

Now you see what is really dark:

Blue areas are lacking detail, i.e. pure black. And not all of the person is blue.. so uh oh, there’s still detail lurking in the image.

Well, then drag “Blacks” to the left in the BASIC pane:

…until you see something like this:

And now finally the blacks are black, and no amount of increasing exposure will bring back detail. (OK – this is not really true: Lightroom is very conservative and preserves some detail even when blue shows. But to all intents and purposes, you’re good, and that detail will not be seen.)

___

Allow me to once again point out these few additional learning opportunities:

All workshops will be announced via email and press release shortly, but you, my readers here, still have first option!


Work to be done.

As you know, I believe that as a photographer, you should, as much as possible, make your photos in the camera, not in post-production (like Photoshop or Lightroom).

But there is always some work to be done in post. This is one reason that photographers cost money – time is money.

Yesterday, I shot celebrity wedding planner Jane Dayus-Hinch of “Wedding SOS”, at the National Bridal Show in Toronto:

But at an event, circumstances are never ideal and as the photographer, I try to be quick. That means there is work.

Take this shot, of Jane in front of her booth:

Fine, but this was at a busy show. So we had to clear space and shoot with what we had (a Canon 1Dx and an off-camera flash in an umbrella). That gave me this:

So what kind of “Post” work did that need?

  • Cropping, probably the most important step.
  • Rotating, to make horizons horizontal.
  • Perspective correction – parallel lines should be parallel, not converging.
  • Lens corrections to remove barrel or pincushion distortion, common with zoom lenses.
  • White balance and exposure fine tuning
  • Removal of “stuff”, like exit signs and columns in the background.

Only after these steps is it a professional photo. And those steps take time. And there’s 100 photos to be looked at this way.

So when you hire a pro, or when you are the pro, count on a lot of extra work to finish the product. Fortunately, Lightroom (and Aperture of you are so inclined) are lifesavers – they have cut 80% off my previous “post-time”.


Firmware Note

If you have not done so yet, you may find it useful to check for updates to your camera’s firmware regularly.

I have a Canon 1Dx, a Canon 7D, and a Fuji X100 (the latter pictured here, in a close-up shot from a class on Friday):

All these cameras have had their firmware (the built-in software that makes it work) updated in the last year; several repeatedly. I just noticed last night that the 1Dx had another update waiting; one that introduced some important new functionality. I am now up to date again!

How do you update?

  1. Search for “<Camera name> firmware update” on Google.
  2. Then check your firmware against what options are available, if any.  These are usually (in all cases I have seen, certainly) free updates.
  3. If an update is available, first ensure that you have a cleanly formatted memory card and a full battery.
  4. Then download the file, and install, following instructions.

It’s simple, and it’s worth it. If a camera has available updates, they will include new functionality and often bugfixes as well. In some cases, like the 7D update and the X100, it’s almost like getting a new camera.

___

NOTE:

As you may know, my “52 photographic recipes” eBook is available now from http://www.speedlighter.ca/photography-cookbook/.

Also, learn to shoot nudes from me on March 2 in an all-day (10AM-5pm) workshop in a great Hamilton, ON Studio: See more, and book, on http://www.cameratraining.ca/Nudes.html