Near London? Come see me 6 Oct 2016

Do you live west of Toronto? Anywhere near London, Ontario?

Then see www.londoncameraclub.ca – you can hear me talk about flash tomorrow night (or tonight, depending on when you read this), Thursday Oct 6, 2016. Come hear some advanced tips and tricks and come meet me. 7:30pm; $10 charge for non-members of the club.

Also keep in mind, 23 October, another small (5 people max, some spaces left) hands-on Flash workshop. See the meetup.com web site.

Now back to my presentation.No rest for the wicked. 

Oh vanitas vanitatum, omnia vanitas.

An ancient Latin saying. Obviously ancient if it’s Latin.

And a self portrait, obviously not ancient, unless perhaps my age puts me into that category.

Michael Willems

Oh vanity of vanities, all is vanity.  Manual focus on an object that is sitting where I will be. Then use the timer shutter release. Camera on a tripod. or on a table.

So is this a “vanity” photo?

No, it is more of a storytelling photo. Photos can be more interesting if they imply that there is clearly a story behind the photo, and it is not a straightforward one like “happy clown”.

If you are on my course: much more coming. If not: get the books, come back here, and keep reading. Enjoy!


Dutch Master Classes

The Dutch Masters of the 17th century created visual art the likes of which the world had never seen. In what you might call an explosion of creativity, they changed visual art, its accessibility, and its popularity forever.

It turns out that they had certain commonalities. In particular, they combined the following:

screen-shot-2016-10-01-at-23-30-32

  • An amazing amount of technical knowledge.
  • Fortuitous timing: technology, education, trade, and societal wealth were all on their side.
  • A great degree of creativity.
  • A great emphasis on light.
  • A love of realism.
  • Clear picture storytelling (“narrative directness”).
  • A love of portraiture.
  • Great informal rapport with their subjects.
  • Master Classes, held by experts for their apprentices.
  • An inquisitive and exploratory nature. A number of Dutch Masters travelled to Italy to learn Light Theory.
  • The Masters carefully painted some nudes—as much as the times allowed.
  • They engaged in speculative art: for the first time, they created art without a sale, in the hope it would sell later.

It turns out that these are exactly the things that makes photographers great. Hence the Dutch Master Class theme: you can learn from history. The Dutch Masters would be delighted that their art, their learning, their creative insights are being used and taught today, almost 500 years later. In my Dutch Master classes, that is what I do: by continuing the tradition of many centuries, I set your creativity free.

I am therefore happy that this message is catching on. This blog is widely read; my workshops are popular (The October 16 Hands-On Flash workshop has just one spot left), and my non-DRM e-books are read worldwide.

These are great days for photographers, whatever doom and gloom messages you may hear. Sure, there will be change, but photography is not about to become less popular. Today, there is an easier-than-ever path from a vision in your head to a beautiful print on museum paper (or an image on your screen). Allow me to help you achieve that dream, the dream of being able to visualise your artistic vision and create lasting art.

And this blog will help, as will the other ways in which I teach. Stay tuned and see you on one of the seminars.

Flash—Change

I have made a change to the Hands-On Flash Workshop schedule (see two days ago): Oct 2 is cancelled and is added to Oct 16.

(Re-?) familiarize yourself with flash and come to the Sunday afternoon workshop in my studio in Brantford, Ontario:

  • Sunday Oct 16, 2016, noon-5pm: HANDS-ON SESSION: Master On- and Off-Camera Flash, Manual & TTL. $199, Limited to five students; there are only three spots left. View details/reserve your spot

20160923_212342_318_1dx_0879

The Workshop Program:

Prerequisites: You need basic camera knowledge and a DSLR camera. Bring that camera, and IF you have it, your flash. I supply all studio equipment, snacks and drinks. If you have a Sony camera, you may need a converter to standard flash hotshoe.

What we do: In five hours, in a combination of lecture and lots of hands-on, I will free your creativity by showing and teaching you:

  1. The minimum required technical knowledge. This includes a quick review of camera basics and flash background knowledge.
  2. How to think about a flash photo. My unique method suddenly makes it simple!
  3. The four (and only four) types of background exposure.
  4. The Three Magic Recipes: “studio”, “event”, and “outdoor”.
  5. How to fire remote flashes using your camera’s system (Canon, Nikon).
  6. How to fire remote flashes using Pocketwizards.
  7. TTL or manual? How you decide.
  8. Strobes or speedlights? Pros and cons of both.
  9. Alternate radio triggers: Yongnuo.
  10. Bouncing a flash.
  11. Lighting a portrait.
  12. Using a flash meter.
  13. Using modifiers: Beauty dish, softbox, snoot, reflector, grid, and gel.
  14. Special techniques: ring flash, etc.

Bring a camera, and a flash if you have one, and the rest is provided. You will leave with knowledge and real life, confidence inspiring, hands-on experience.

Flash, Hands On.

With the dark season ahead, but with plenty of sunshine yet, it may well be time to (re-?) familiarize yourself with flash. In which case you may be interested in an upcoming Sunday afternoon workshop, and a repeat of the same, both in my studio in Brantford, Ontario:

  • Oct 2, 2016, noon-5pm: HANDS-ON SESSION: Master On- and Off-Camera Flash, Manual & TTL. $199, limited to three students. Only two spots left. View details/reserve your spot
  • Oct 16, 2016, noon-5pm: a repeat of the same workshop. $199 if you book soon, limited to five students. Only four spots left. View details/reserve your spot.

The Workshop Program:

Prerequisites: You need basic camera knowledge and a DSLR camera. Bring that camera, and IF you have it, your flash. I supply all studio equipment, snacks and drinks. If you have a Sony camera, you may need a converter to standard flash hotshoe.

What we do: In five hours, in a combination of lecture and hands-on, I will free your creativity by showing and teaching you:

  1. The minimum required technical knowledge. This includes a quick review of camera basics and flash background knowledge.
  2. How to think about a flash photo. My unique method suddenly makes it simple!
  3. The four (and only four) types of background exposure.
  4. The Three Magic Recipes: “studio”, “event”, and “outdoor”.
  5. How to fire remote flashes using your camera’s system (Canon, Nikon).
  6. How to fire remote flashes using Pocketwizards.
  7. TTL or manual? How you decide.
  8. Strobes or speedlights? Pros and cons of both.
  9. Alternate radio triggers: Yongnuo.
  10. Bouncing a flash.
  11. Lighting a portrait.
  12. Using a flash meter.
  13. Using modifiers: Beauty dish, softbox, snoot, reflector, grid, and gel.
  14. Special techniques: ring flash, etc.

Bring a camera, and a flash if you have one, and the rest is provided. You will leave with knowledge and hands-on experience.

All sorts of everything.

I am shooting a three day event, a conference, at Niagara Falls, while my son house-sits back home. So I shoot lots of speakers and so on,
20160915-mw5d0313-1024

And I love this kind of shooting because if done well, it leads to so many “oh wow” reactions.

But only if done well, and it is complicated:

  • I am using a long lens (70-200) without flash, and on another camera, a wide angle lens (16-35mm on a full frame camera) with a flash, so all settings are totally different from shot to shot.
  • Many, many different environments. A large ballroom. Hallways. Smaller rooms. Restaurants (several). Easy bounce, Then, no bounce. Then, difficult bounce. Coloured walls. Every shot is an engineering challenge!
  • Speakers who will not stop talking, or stand still, or even turn the same way, for a millisecond.
  • Dead batteries all the time.
  • Heavy cameras, two of them. And the arthritis in my hands doesn’t make this any easier.
  • The need to minimize post-production work. Hundreds of times “just a moment or two” means many moments, and that means “hours and hours”..
  • Tough environments including “dark inside with bright outside also visible in the shot”, like this:

20160916-1dx_0435-1024

But it does not end there…

  • TTL does not always work well when there’s reflections, so I have to use Manual flash setting for a lot of the work. And that is sensitive to changing the distance to the flashed object (“inverse square law”).
  • Impossible white balance.
  • Bouncing means direction, and you need to think about that direction: “Where is the light coming from?”

So I really have to work for my pay. Fortunately, I love my work. And there are ways to make it easier: start with good starting points, like the Willems 400-40-4 rule (look it up) as your basis, and adjust from that basis. When you take my courses or buy my e-books, you will learn these starting points.

And then you can shoot quickly and get great colour, and with a modern camera this applies even at high ISO. Here, for example, is beauty:

20160916-1dx_0494-1024

No, I did not mean the girls. Well, yes, they are very beautiful, too, but I really meant the venue and the colours. This is why I love flash.

In the next few days, some more about this shoot. It is 1:15 AM and now, finally after a 16-hour non-stop day, I get a rest. But only until 7AM.

And then back to Black Betty, who is waiting patiently in the garage for me:

20160916-mw5d0486-1024

And then tomorrow evening, I run a photo booth, 80km away. No rest for the wicked!


Shutter speed isn’t all there is to shutter speed.

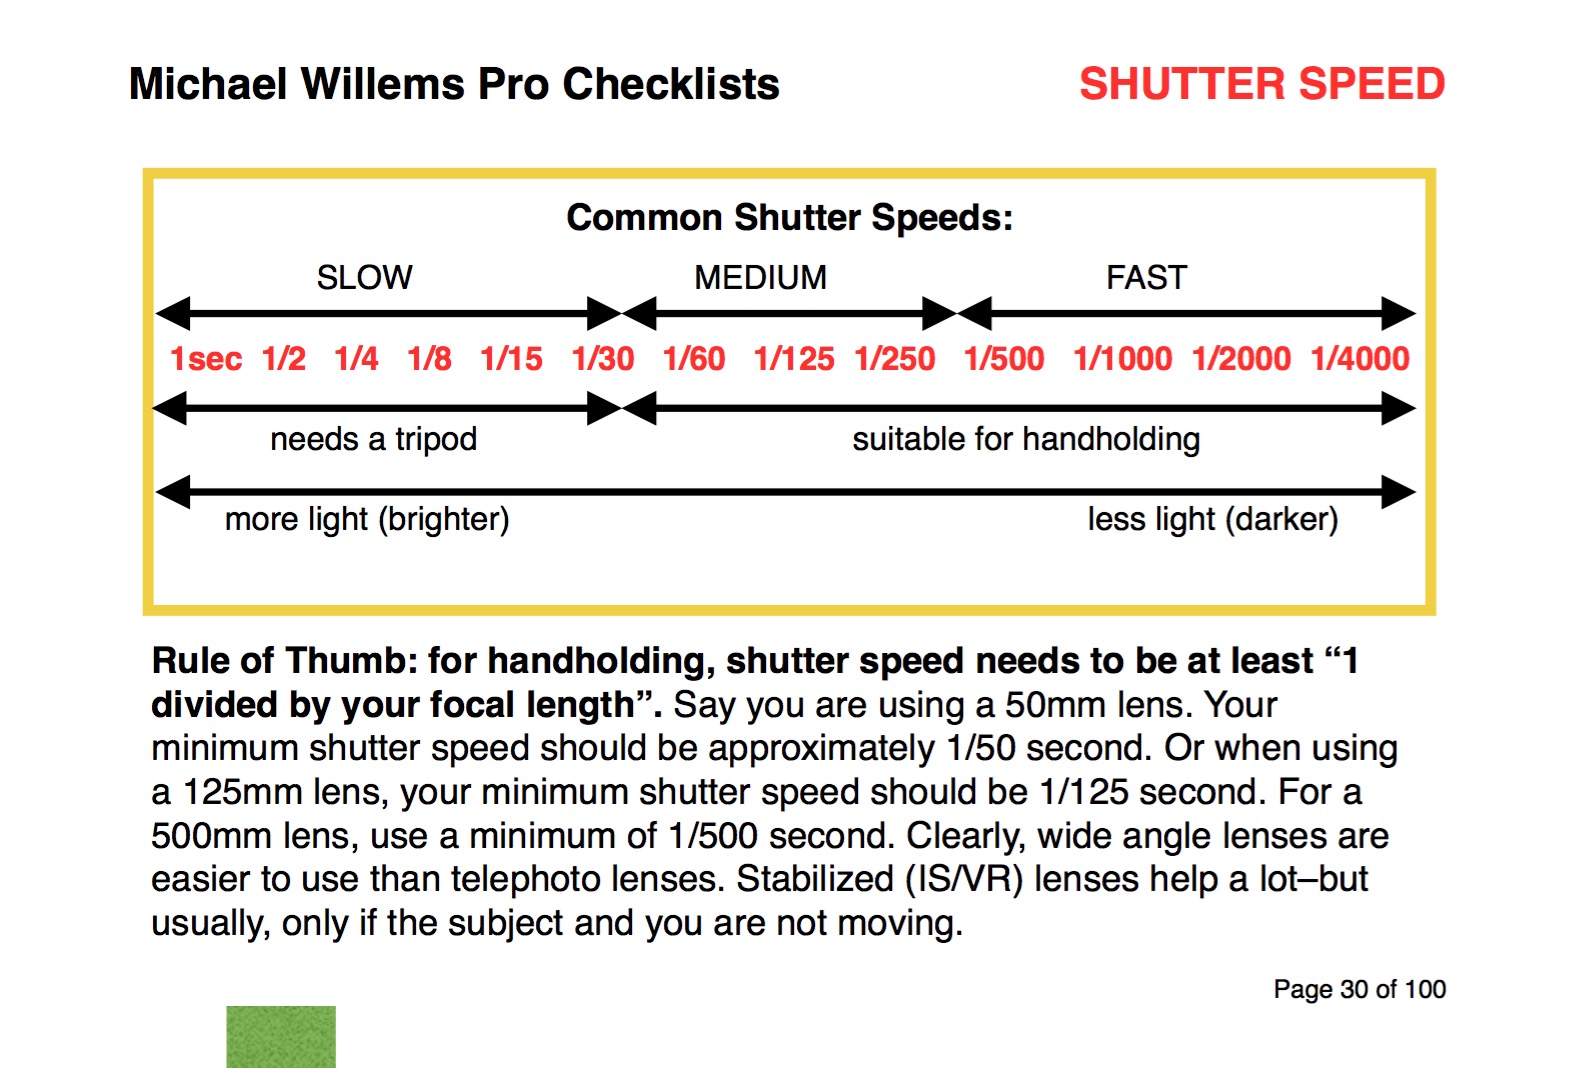
“Shutter speed” isn’t all there is to shutter speed.

Uh oh. Michael is The Oracle. What on earth does he mean by that confusing statement?

Well, let’s have a look. Let’s set up a couple of gelled and gridded speedlights (using Honlphoto grids and gels) and get a talented life model. Which is exactly what I did in August 2012 at Brock University, during the 5-day flash course I was teaching for the Niagara School of Imaging.

But wait. Because I want to show you the setup, let’s allow in some ambient light. To achieve this we use a really slow shutter speed, of 0.6 sec. More than half a second, in other words. That lets in some ambient. Not a lot, but enough to see the classroom, some of the equipment, and so on.

The picture, showing the setup with the two flashes, below. Look at the two little gelled speedlights, can you spot them? Purple gel on the left and yellow gel on the right:

tumblr_m94klicvuq1qfts2ko1_1280

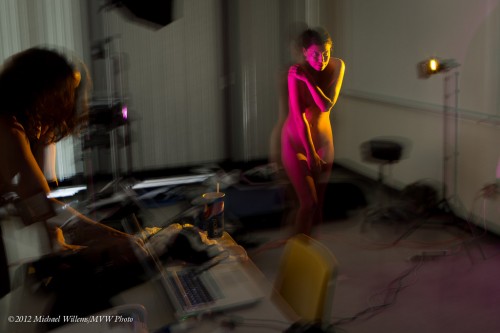
OK. Great. Blurry as heck, of course: 0.6 seconds is ridiculously slow. Impossible to hold still. Right?

But wait. Lots of blur, yes, all over the picture, but look carefully. Click on the image to see it full size, and now look carefully at the model. What do you see?

She is sharp. No blur on her: she is tack sharp. There’s blur all over, but not much on the actual subject. A little “ghosting”, but she is substantially sharp.

But that’s impossible: the shutter speed was 0.6 seconds. So she must be blurry! Right?

So that’s where I say “‘Shutter speed’ isn’t all there is to shutter speed”. The shutter speed may be 0.6 seconds, but the model is lit primarily (almost exclusively) by the flashes. And the flashes flash at 1/1000 second or faster. At 1/4 power, they flash for just 1/4000 second. So while the shutter speed may be 0.6 seconds, as long as the subject is lit only by the flashes, our effective shutter speed is 1/4000 second!

And that is why you see a sharp model: there is very little ambient light on her, so the effective shutter speed is determined almost exclusively by the flash speed. Which is very rapid.

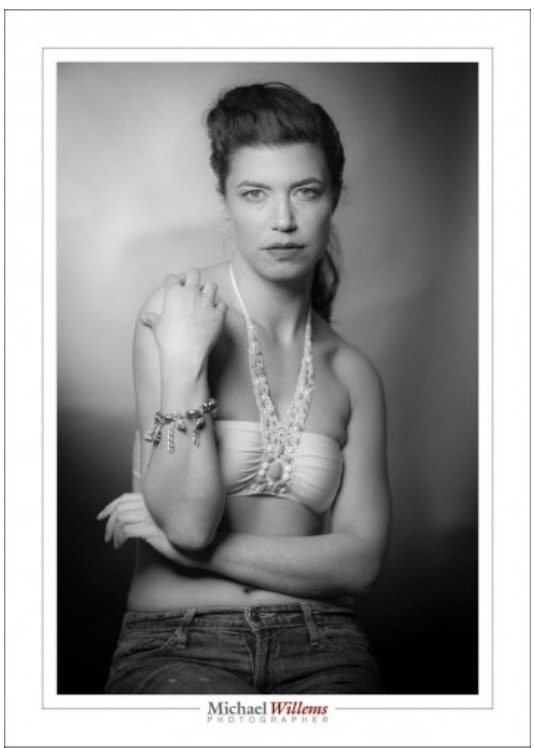
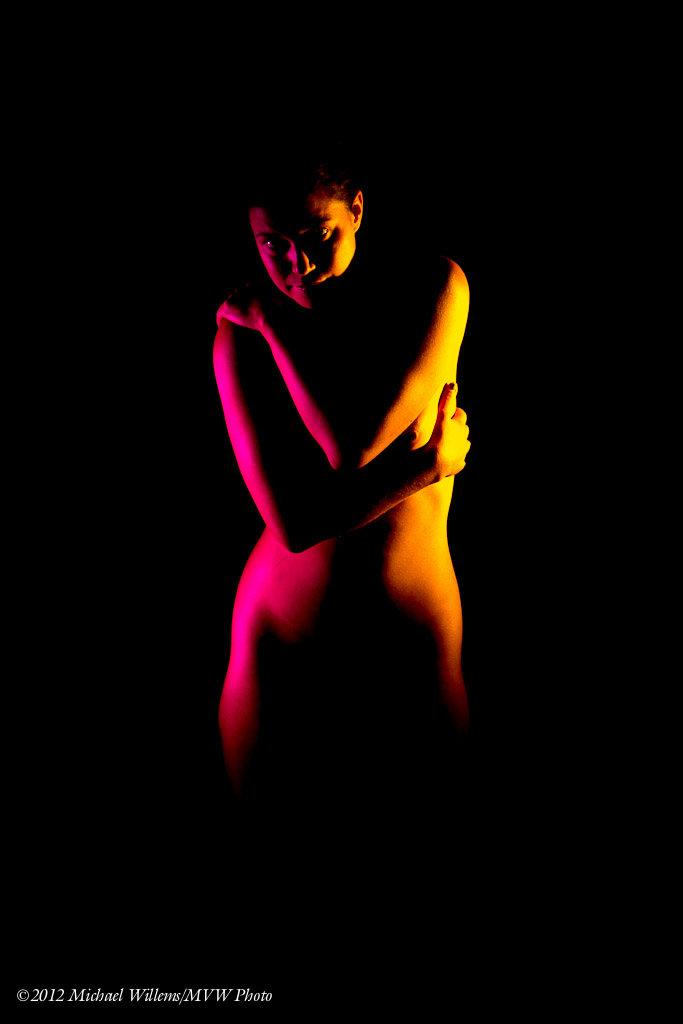
So now let’s do a normal shutter speed, of 1/125 sec, so the ambient light is cut out. And here is the finished product:

tumblr_m94knozSgL1qfts2ko1_1280

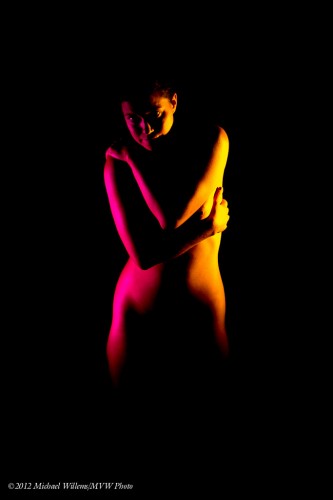
So anyway. This is a studio shot. So I want no ambient light: the second picture, in other words.  But when I shoot an event, like a wedding reception, I want to let in some ambient light to avoid those cold, black backgrounds. Instead, I want a nice warm background. To achieve that, I am happy to shoot with shutter speed as slow as 1/15 or 1/30 second. And now you know why I can get away with that.


Yaay! Natural!

You have all heard about the grassroots campaign against dihydrogen monoxide?

This chemical, which if ingested in large quantities can be deadly, is present in most manufactured foods. It is even in our water supply.

Which is not strange, considering the fact that “dihydrogen monoxide” is just another way of saying “H2O”, i.e. water.

The reason this joke works is that people have been conditioned to like “natural”, eat “natural”, and to resist anything artificial. As though Ebola, disease-carrying mosquitos and bone cancer aren’t “natural”!

And we see the same in photography. Oh so often do I hear people proudly proclaim that they use “natural light”.

That is fine, nothing against that. I use available light quite often. But to be proud of it? To me, that’s like proudly saying “I am walking to Rome!”. Personally, I’d rather be carried there on a luxury yacht, or in a Saudi royal’s personal 747 with golden faucets. And similarly in photography I use the tools that suit my needs. Whether they are “natural” or not. I am as happy using flashes as I am using sunlight. Except flashes give me more options in more conditions.

So I’d say, use what works for you. Whether it is “natural” or not. And learn all types so you have the option when needed.


Flow, or moment?

As every photographer knows, you use shutter speed to either blur, or freeze, motion. That is what the shutter is for, creatively speaking.

A slow shutter speed, like 1/10 second, gives you blurred motion, as in this photo I took at a country music event the other day:

20160820-MW5D9704-1024

While a fast shutter speed, like 1/800 second, freezes motion:

20160820-MW5D9702-1024

See the difference?

Incidentally:

Q: If picture 2 was taken at 1/800 sec, why is it not darker than the first picture, which was taken at 1/10 sec? Over six stops darker?

A: Because at the same time as selecting a faster shutter speed, I selected a larger aperture: f/1.4 for the second picture, as opposed to the f/22 I used for picture 1.

Anyway. Here’s the core question I get quite often from students:

What drives the decision “do we blur or freeze?”

First, a flow looks better blurred, while something that happens as a moment in time looks better frozen. So generally speaking, for a fountain like this I would use a slow shutter speed.

What constitutes “slow”? See this excerpt from my Book 7, Pro Photography Checklists: 100 checklists, summaries, and Best Practices.

Screen Shot 2016-08-13 at 17.04.29

What is slow, and what is fast? 

So, OK, slow or fast determines motion: blur or freeze. But there are other considerations. Like “do I want a blurred background” (which would mean a low f-number, which in turn would mean a fast shutter)? And like aesthetic considerations: the frozen fountain looks kind of cool, in this particular case.

And so it is with many photography decisions: you have a rule of thumb, a starting point; but then you interpret that creatively. That goes from everything from motion to colour to the rule of thirds. You are the creative driver, not the book or the camera or social pressure.

So if you have a reason to not use some established rule or starting point, then by all means do what you want. (In the absence of such a reason, though, go with the recommended Best Practice or Rule of Thumb.)