Sharing A Shoot

Say you have sot with someone else. Now you want to do your post, and then send them the work you have selected. The RAW files, but also what you have done to them.

If you use Lightroom, that is easy.

Go into the Library module.

Select the shots you have chosen to share. Verify that you have selected them (at the bottom, Lightroom will say something like “125 of 200 selected”).

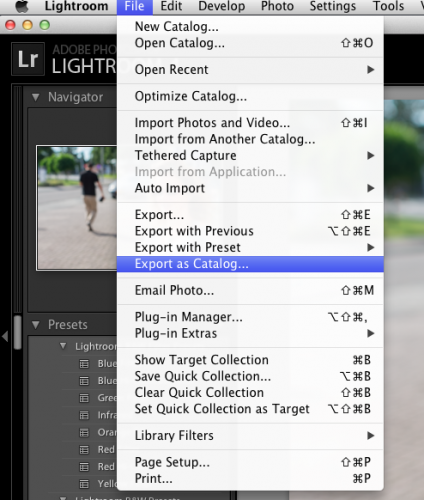
Now go to FILE and select EXPORT AS CATALOG:

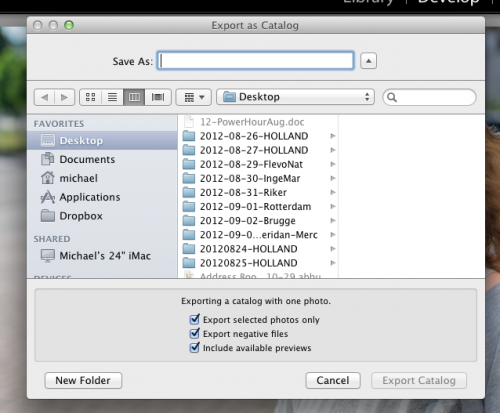
Select a location (I like my desktop). Make sure you turn on “Export Selected Photos Only” and “Export Negative Files”!

Now share the resulting folder and all its sub-folders (e.g. via Dropbox – ensure that you have enough Dropbox space).

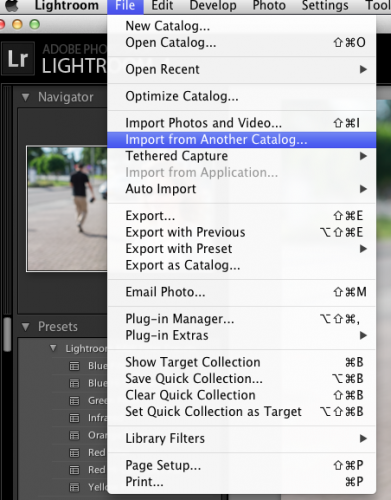
Then on the  receiving side, select “Import From Another Catalog”, and indic ate te folder in question.

Those folders are now added to your library, and the originals are moved in as well. Mission accomplished!


Video (2)

Another note about video. Last night I shot an event: a Bat Mitzvah party – here’s a sample of the beautiful Bat Mitzvah girl:

The event was also filmed by a videographer. And that’s something I admire.

One reason people like me, i.e. stills photographers, tend to shy away from video is the time it takes. Like right now… I am importing a 15-minute drive video into iMovie. 30 fps 720p. This import is taking around 72 minutes – that’s 72 minutes during which my iMac is doing, well, basically nothing else.

And after that I need to edit. For a “real” video, that would include:

  • Choosing clips
  • Adding establishing shot
  • Making them into a coherent story
  • Transitions between clips
  • Intro, outro
  • Adding any text
  • Editing sound, adding sound, adding soundtrack
  • Then exporting
  • Then uploading (to Youtube, say).

This process could easily take a day or more, even with very simple tools like iMovie.

This is in addition to the setup work. The JVC camera makes it a lot of work: every time before starting I need to:

  1. Mount and power up the camera
  2. Select “Power supply” (as opposed to USB data)
  3. Format the camera card
  4. Reset it to 15 minutes rolling video
  5. Exit the menu
  6. Start recording

Steps 2-5 could easily be removed by JVC – hope you are listening, JVC, and I await the new firmware with interest.

In any case, video means serious work. But it’s worth doing, because at the end you get an experience which complements the stills videos very nicely. It does not replace stills at all, and it never will – stills give you the power to contemplate a moement in time, while video means these moments are ephemeral and pass by as quick as they appear. The two are complementary, and if you are interested in doing both, then learn the basics skills you need. Establishing shot, B-roll, transitions: all these are things you need to know. And especially “cutting room floor”: shoot ten times more than you use!


JVC Video Action Cam – short review

Those of you who know me know that I do not do a lot of video. Stills, mainly! Why? Because video takes rather too long for my liking to produce. Hours just to load, edit, convert, and so on, even for relatively small clips.

Still, I keep my hand in there! One way is by using a new dash cam I just bought for my car (you never know). It’s a JVX GC-XA1 “Adixxion” action camera:
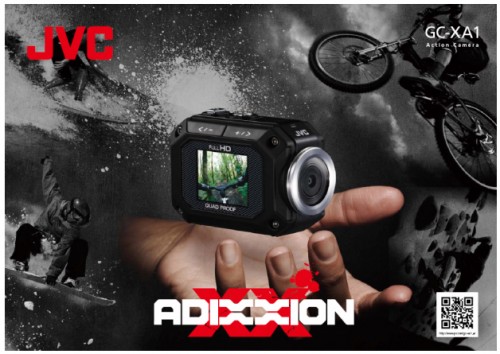
This is the kind of camera  that you can tie to your bike or helmet or whatever: small, light, one hour battery life (though you can use a USB power cable as well). It is shockproof, waterproof, freeze-proof and dustproof – a step up from the usual small cameras.

It shoots high-def video, of course, up to full 1080p, with a simple wide-angle lens. Remember, wide angle is good because it is easy w.r.t. shaking and it is easy w.r.t. focusing.

Even better, I was able to buy it locally in Oakville, ON – I like to see what I am buying. My friend Steve Jones pointed me to a car-related company that sells these: Johnston Research & Performance at 2344 South Sheridan Way in Mississauga, ON.

So is it suitable as a dash cam? Yes it is, and more than I thought.

  • It is tiny (and well built).
  • It comes with a couple of mounts, suitable for sticking it, as I did, to the car windscreen. The use of a standard tripod socket means you can mount it in myriad ways.
  • It has image stabilization.
  • The wide angle is perfect for dash cam use.
  • It has features even the store was unaware of, including the ability to just record a rolling 15 minutes, where just the last 15 minutes are saved – this can be kept going.
  • The camera can also be used upside down – in my case it is, because it is stuck at the top of the windscreen. Perfect!
  • It has a screen to monitor what you are doing.
  • It links to iPhones, iPads, Android devices, and personal computers. It has many connection and streaming options.

I just tested it during an actual drive. Here’s a 40 second HD link:

http://www.youtube.com/watch?v=IyNY8g8BoaI&hd=1

Note, this is not the highest quality this camera can do – rolling 15 minutes (and USB -powered operation, which requires it) is restricted to 720p at 30 fps  – which as you can see is pretty great (on that subject, a few encoding tips from Youtube here.)

So is there anything this camera could do better? Well, that’s a value judgment, but if I were to respectfully give the engineers at JVC some tips on how to make it even better, especially as a dash cam, I would say:

  1. Make the USB port accessible for power without having to keep the cover open.
  2. Do not ask every time a USB plug is  inserted whether it is for connecting to a computer or for connecting to power! This is a pain: I should be able to set my preference and be done with it until that changes.
  3. Display upside down while recording upside down! Instead, the camera displays upside down, but as soon as you press record and turn the camera around, it displays the normal way (but fortunately, still records upside down).
  4. The computer app is available only for Windows. Mac app would be nice.
  5. There is no way to save your favourite settings as a “personalized setting”; this, too, would be a useful addition.
  6. Recording while using USB power is only allowed in 15-minute rolling recording mode. Why, JVC?
  7. It would also be useful to have a mode where the camera automatically turns on when USB power comes on (when the key is turned in the ignition).

This is a list of features that I hope will be added in future firmware: I already upgraded the firmware after buying the camera. JVC, please keep me informed of firmware updates on this excellent little camera. Also,  please fix typical “Japanese”: errors in English (“Inversed” is not English; “Inverted” is).

And for your benefit, I shall try some more video in the coming weeks. I am pleasantly surprised by the fact that even with slow North American Internet speeds, uploading video is becoming practical at least for clips. And I am impressed by this great little camera.

Oh, and why a dash cam? Because it is a good way to do some more video.. and also this: go to http://carcrashes.altervista.org/ to find out. Protection in case of insurance claims – or even scams. Try and explain to the cops what happened without video evidence! And I don’t think I ever want to drive in Russia.


Finishing a picture

I often shoot studio shots. And these often need finishing – you cannot always shoot what you want in the camera, for very practical reasons. Like space.

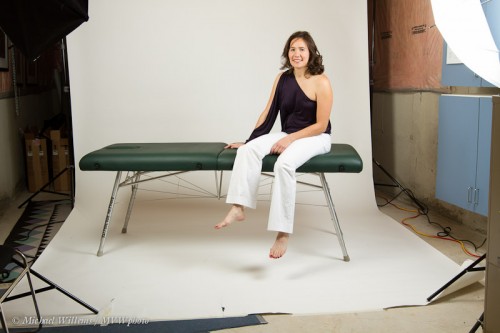
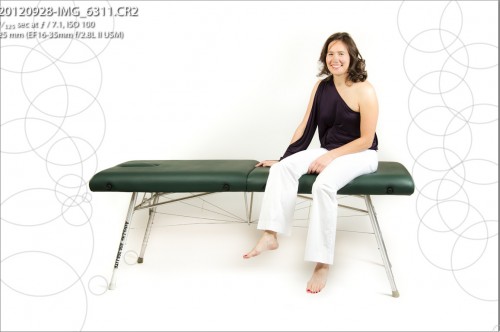
Take this for example.  My friend and client Sarah, a physiotherapist, needed some portraits, including a shot of her with her table. We shot these Friday night. My studio is small, and even with a wide background, the table only just fit:

But “just” is enoughn.

So now the post work. I chose to do this in Lightroom’s “Develop” module, as usual.

  1. First, I straighten the image.
  2. Then I change the whites to make them fuller white.
  3. Then I adjust any other exposure paramaters.

These adjustments are minimal except for the whites: Lightroom 4 dims my overexposed areas; but I want them overexposed, since this is for white background web use. I shot them overexposed too – blinking furiously – but Lightroom sees latitude in the RAW file and pulls the whites back from what I did. So I correct that (“Whites” and “Highlights” adjustment).

And now I do the rest. I first use the clone too to roughly fill in the sides:

That’s rough, but a good beginning.

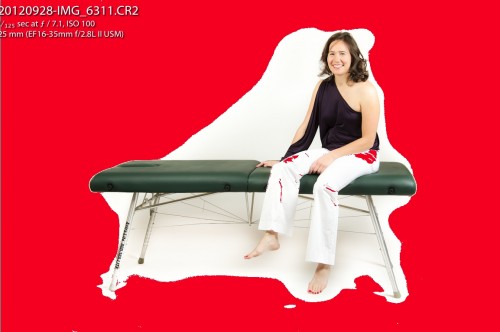
Now I turn on the overexposure warning (the right-side triangle in the histogram), and I use the local adjustment brush set to +2 exposure to fill in the whites properly. Once that is done, I see:

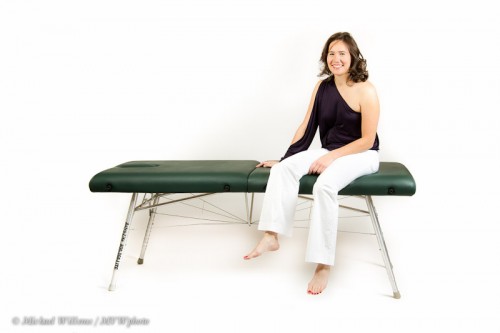
I then make last minute adjustments (such as using the brush to decrease the overexposure on the legs), and then I have my finished image, ready to go on the web:

That does not take long – that’s how it is done in Lightroom. Yes, I could have done it in Photoshop, but that would take longer. What I can do in Lightroom, I do in Lightroom – fortunately, that is almost everything.


Tip of the day…

You know how I say it is advantageous to set your white balance right when shooting? If you are shooting RAW (as I hope you are) it makes no difference-  all colour is captured and you can do it later, by clicking on a neutral white/grey in an image. But on the other hand… if you get it right while shooting, it’s less post work.

So one tip is to, when you have time, use Live View to set white balance. That gives you a pretty good view of what the colour will look like. Set it so you are happy, then after you do that, you can go back to normal shooting.


Stuff happens.

I thought it would be worth pointing out – I have had three photographers contact me in a recent week with tales of lost images due to lacking backups. Three “OH NO this cannot be happening to me!” events. Yes, this stuff really happens.

Re-read my post about backups late July.  And remember: Always have each image in two or more places.

  • I do this from the very start of the process. This is why I have cameras that take two memory cards, so each image gets written to both.
  • Never delete the memory cards until backups are secure.
  • Make backups the moment you have your images on the drive they live on. Not later, or tonight, but now.
  • Verify your backups regularly.
  • Avoid proprietary mechanisms that need proprietary hardware or software. Your backups should be easy to access.
  • Make backups that go to off-site locations. You do not want a burglary or a lightning strike to wipe out all your work.
  • Format your memory cards every time before use.
  • If a card ever gives you trouble – discard it. No questions, just discard it.
  • Refresh old backups regularly – at least yearly.

I thought it might be worth pointing this out again… losing your work sucks, and it is usually avoidable. Just thought I would point this out again.


Fear ISO? Or not?

Here’s the 1Dx, a photo I shot yesterday at, wait for it, 12800 ISO:

Looks good. Now of course when you look at it real size, you see some grain at this high ISO. You can click through twice in order to see “original size”, that is real pixel size.

But with Lightroom noise cancellation you get this:

Either way, completely usable!

Now your camera may not do QUITE as well, but nevertheless I urge you to try. Go to your highest ISO setting, then back off a stop or two, and now try the same.  You will be surprised at how high a modern camera can go without awful noise. And.. grain is always preferable to motion blur.


Lightroom and Products

Can you keep product shots simple?

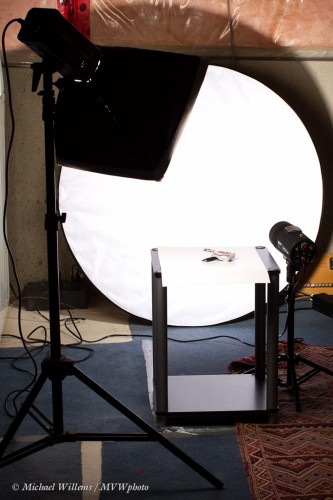
Sure. When I shoot products, I might, for instance, use a simple setup not unlike this:

That is a simple table with a white sheet for the product; then a reflector behind. The product is lit by, in this case, one light with a softbox; while the background is lit by a single light aimed straight at it. (To keep it simple, the lights are both fired by their slave cell; I fire a speedlight on the camera, set to manual 1/128th power, at the ceiling for this.) I use manual on the camera; f/8 at 1/200th sec (ambient light is completely dark with this setting).

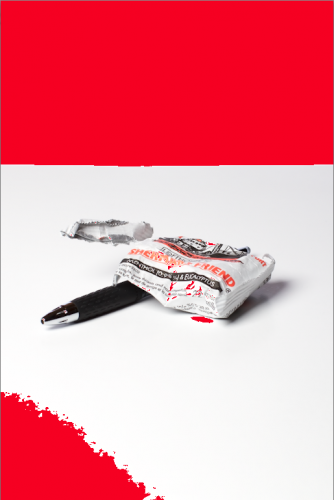
In order to remove any wrinkles from my background, and in order for it to disappear, let’s assume that (as often is the case) I want it to be completely blown out. Featureless. Like this, if I turn on the highlight warning in Lightroom:

Alas, by default Lightroom 4 protects me against myself. It stops me from blowing out the background and if there is any detail left in the background, I get it back, whether I like it or not! So the red areas will not show.

Silly choice, Adobe. I’ll be the judge of what adjustments I want, thank you.

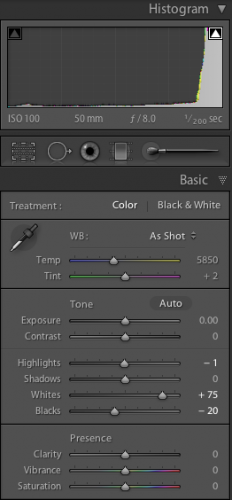
But there is a way to get back my overexposure: turn up “whites” in the Develop Module’s Basic pane:

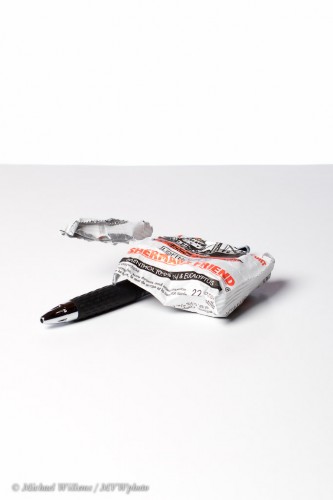
In this case I had to turn up the “Whites” setting to +75 to get back the picture above (which corresponds to the way I saw it on the camera’s back).

I turned on the line surrounding the picture, else it would vanish into the page (which is why I overexpose it in the first place).

Another simple product option: I used a light table with a curved back, another option, today during the class I taught at Vistek:

Again, a simple solution: a speedlight connected to the camera via a cable, and a Honl Traveler 8 softbox on the speedlight. Everything handheld.

So yes, youcan keep product shots simple.


Flip

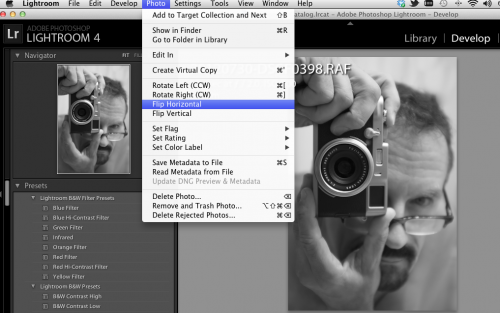
Quick Tip: When you shoot into a mirror, for your next Facebook avatar (go on, admit it, you’ve done this shot), then you get a mirror image – which is incorrect (eg you cannot read any text in the image, and faces look very different, since we are not totally symmetrical).

The fix is simple: in Lightroom, go to the DEVELOP module and use function Photo – Flip Horizontal:

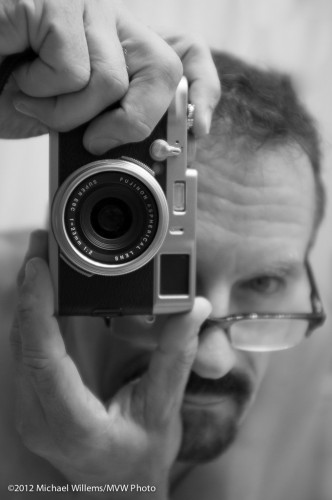
Now your image is true.

You can now read the writing on the front of my lens.


White Balance

Since you presumably shoot RAW, the White Balance (WB) setting (and I do wish they had called it “Colour Balance”) is unimportant: you can set it later in Lightroom or your software of choice, for one image or for an entire group, with no penalty.

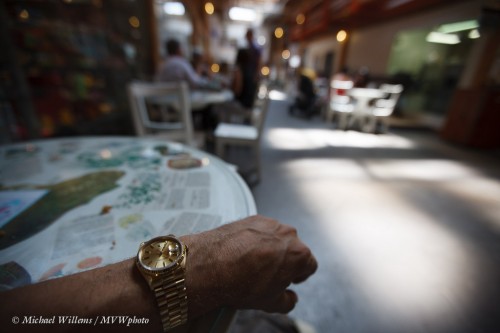
Yes, but, as you have heard me say here before, you might as well feel good about yourself. Say you shoot indoors on a sunny day, and the “Auto” setting produces this, as it did for me yesterday agt my exhibit:

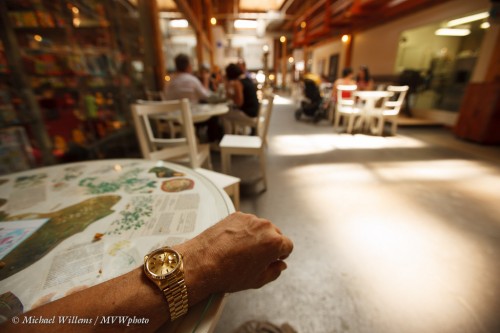
Looking at the back of your camera, you wil not feel great about your shots. So why not, jst to make yourself feel better, set the WB setting to “Shade”? You will get something more like this:

Looks better to me – more like what I was actually seeing. And if I do manage to get it right in the camera, there is less work to do later.

So what do I normally do? My strategy is to leave it on AUTO unless I have extra time; then my strategy is to get it right.

I can also

  • Use K settings – Degrees Kelvin;
  • Or take a shot of a gray card and use that as my “custom” reference. By definition, this gives me perfect white balance.

One time-saving note: if I do neither of those and leave White balance on AUTO, I do try to take one picture of a neutral gray object – like a gray card – in each lighting situation. That way I can quickly grab each ;lighting situation with the dropper in Lightroom and get the colours exactly right instantly in post-production.

As you see, there are many possible strategies. choose the one that best matches you and the particular shoot you are doing, and it will be one thing less to worry about. So that you can concentrate on your compositions!