Warm day

It was a warm-ish day today, so I went and took some car photos.

Since the sun was out, it is no surprise that I found available light a little boring:

20170408-1DX_3949-1024

So.. I added a flash, on a light stand. But as you will have guessed one flash was, of course, not enough to light a big subject like a car…:

20170408-1DX_3951-1024

…so I added two flashes. Left flash: half power manual 600EX, aimed direct at the car starboard side (zoom=50mm). Right flash: half power manual 430EX, aimed direct at the car front (zoom=50mm).

And that gave me this photo:

20170408-1DX_3965-1024

Desaturated slightly; otherwise this is the way I shot it.

But… say what—Two light stands? Fired by pocketwizards? Isn’t that complicated?

Yes, yes, and no, respectively. It is not complicated. And the results, as you see, get you immediately beyond the “snapshot”. And that is satisfying.

Michael teaches flash and other photography subjects; at Sheridan College and privately; and at his own school. If you want to know more, come to one of my regular courses (see www.cameraworkshops.ca).

An Essential Tool

If you take your photography seriously, you need to avoid one thing in particular: running out of battery power just when you need it. (Have you noticed, batteries never fail at a convenient time?)

The solution is simple. Buy a battery tester, and use it before you go and shoot.

A battery tester, which sells for about $7–10 in your hardware store, is a meter with a “battery” mode. That mode does not just measure voltage; instead, it measures voltage under load.

IMG_0532

You recognize it by its mention of batteries (like “AA”, as in this example).

Before every shoot, measure your batteries, and if in any doubt, replace them. That takes away one big drawback of battery-powered equipment.

  • Where do you use rechargeables? A: In gear that you use intensively and often: namely, in your flashes.
  • Where do you use Alkalines? A: In equipment that uses little current and that lasts many months between battery changes. Namely, in your PocketWizards and similar radio triggers.

One more note: if you use rechargeable batteries, make sure that you use an appropriate meter. NiMH batteries have a lower voltage than Alkaline batteries, so you cannot measure NiMH batteries with a meter intended for Alkalines (or vice versa).


Time and space

Sign up now: there’s time and space to learn all about flash. A model and make-up artist will be supplied for the workshop I am teaching on January 28 in Toronto. In this workshop, from knowing “nothing”, you will learn creative flash in half a day.

20170101-1dx_3062-1024

Recent single flash shot. Studio settings; manual; off-camera; 1/8″ grid.

And this includes:

  • Setting up your camera for flash.
  • Why use flash when it’s bright outside?
  • TTL or manual flash: Why go manual, and when?
  • Speedlights or studio strobes?
  • What are the limits to using speedlights?
  • Modifiers: gels
  • Modifiers: grids and snoots
  • Modifiers: softboxes and umbrellas.
  • “Magic recipes”: shortcuts for outdoors, indoors, and studio flash.
  • Common mistakes – and avoiding them.
  • Off-camera flash: How? Why?
  • Using radio triggers (which ones?)
  • Secrets of creative lighting – examples with model and make-up artist.

You will leave with a few great portfolio shots, but also with an understanding of, and “quick start” recipes for, handling each flash situation that you will come across.

This course is intended for everyone from beginner to pro. What you have in common is that you have an SLR camera, you know little about flash, and you want to learn all about it. Bring your camera! If you have a flash, bring it; if not, no worries: everything is supplied.

There are spots left but space is limited, so sign up now.

Blurrrr.

“How do I get a blurry background?”, asks a student.

20161219-1dx_2654-1024

OK… so if you want a blurred background, as in a portrait:

  • Focus accurately (using one focus point?) on what should be sharp. The eye of your subject, for example.

Then, use some combination of:

  • Get close to your subject.
  • Zoom in on your subject.
  • Use a longer rather than wider lens.
  • Use a lens with a large maximum aperture, i.e. a low minimum “f-number”. (Most prime lenses and most pro lenses are like this).
  • Use a low f-number
  • Use “portrait mode” (which uses… a low f-number!).
  • Have a distant background

And that’s how you do that. As my students at Sheridan College are learning this semester.


Happy New Year!

Happy New Year from The Speedlighter! 

As for your 2017 resolutions, how about this one: Make this the time you finally perfect those skills you always wanted to hone! Skills that allow you to quickly and easily do pictures like the ones I took over the last couple of weeks. These include a few animal (and animal-plus-owner) pictures:

20161110-mw5d1613-1024

20161110-1dx_1783-1024

20161219-1dx_2654-1024

20161113-1dx_1819-1024

All those were made with the 85mm f/1.2 lens, and used a single speedlight in an umbrella.

But I also did an executive portrait, just yesterday:

20170101-mw5d2658-1024

20170101-mw5d2676-1024

Do you see the difference between the two above? For the first one, I did not want to show the outside (boring, homes). Easy, so the picture,like almost all my pictufes, was stright out of the camera.

For the second one, however, I did want to show the blue sky. So I exposed that one less (using the magic Outdoors Recipe–one of the things you will learn if you turn up). Both used flash, of course; fired by Pocketwizards and with their power set manually. The second one used much more flash power because I was using low ISO and small aperture to kill the outside light. I also had to, therefore, brighten the Apple logo in post-production.

20170101-mw5d2655-1024

I would almost call that last one an environmental portrait.

The next ones are certainly environmental portraits:

20170101-1dx_3062-1024

The one above used a 24-70mm lens and a speedlight with a Honl Photo 1/8″ grid. The one below, a 16-35mm wide angle lens and a speedlight with an umbrella:

20170101-1dx_3048-1024

What do they all have in common? Simplicity, good exposure, and a thorough knowledge of the technical necessities.

You can learn this too. Why not do it? I have several great opportunities coming up!

All of these are excellent learning opportunities, and will broaden and deepen your knowledge significantly. Hope to see you there and then. 


Review: Alpine Labs Pulse Camera Controller

“Late December” is a great season, with Christmas, Hanukah, and various other gift-giving opportunities. Especially when Santa brings presents. And Santa brought me presents this year—did he ever!

For starters, my son Daniel bought me this:

20161226-mw5d2449-1024

Superb.

But hardly as interesting to my readers as one of the gifts Jason, my other son, brought me from California—namely, the device I am reviewing here. Here it is:

20161228-1dx_2974-1200

This $99 (US) device is the extremely cool Alpine Labs Pulse camera controller:

20161228-1dx_2974-1200-2

What does a camera controller do? Um… It controls your camera. Duh.

Let me explain. First, here’s how you operate it:

  1. Mount this controller on the flash hotshoe on your Canon or Nikon (but not Sony) camera.
  2. Connect the cable to the mini USB/micro USB input on the camera. Unlike traditional remote triggers, this one uses Bluetooth, and it connects to your camera using the USB port, not the trigger port.
  3. Install the “Pulse Camera Control” app on your phone/tablet (search for it under that name). Both iOS and Android are supported.

20161228-1dx_2970-1200

20161228-1dx_2971-1200

You can now pair the device and use the app:

img_8660

(That pairing, incidentally, could be handled more elegantly. Rename your device and yet it often returns to the default name. But that is a minor issue, and even during my testing I received at least one firmware update, v.1.21. The iPhone app I tested with is v1.3.0.506e570. More about bugs later.)

The device had no trouble recognizing my Canon 5D Mk3 or 1Dx. The Alpine Lab web site has a list of cameras that will work: most current Nikon and Canon cameras are supported.

You can now use the app to control your camera in the following way. First, set the camera to manual focus and preferably to manual exposure mode.

Now use the app to:

  • Set exposure: i.e. set Aperture, Shutter and ISO (your camera should ideally be in Manual mode, and it should be set to manual or back-button focus).
  • Take pictures by pressing the “shutter button” on the app. After you take a picture, you get a preview, which although it is small, low-resolution, an blurry, is very useful. You can also get a histogram, which is also very useful.
  • Take Video, the same way.
  • Make Time Lapse sequences. This is an extremely cool and easy-to-use feature; see the screen capture below. Easy and flexible: It allows exposure ramping, and you can even pause the exposures. Don’t forget to turn off picture review on the back of the camera when using this mode, or you will drain your battery unnecessarily quickly.

img_8662

Exposure Ramping is a very cool feature:

img_0058


  • Take Long Exposure pictures. Without this, all you can do is up to 30 seconds, or use the “Bulb” mode, where you yourself have to hold down the camera’s shutter for the required shutter time. Now, you can easily take 35 second exposures, or 55 second exposures, or any exposures up to an hour and a minute. (You can still use “Bulb” mode also, if you wish, and you can start with a delay).
  • Take HDR combinations. Take 3-9 images, up to 7 stops (!) apart from each other. Pulse allows you to take the pictures; it does not combine them for you. You can do that in Lightroom or whatever app you use.
  • Photo Booth: a very simple photo booth mode where the app takes 1-10 pictures when you hit the shutter; 5-10-15-20-etc seconds apart.

Here’s the selfie, taken with the Pulse, whose preview you saw in the earlier screen shot:

20161228-mw5d2480-1200

This great app does have a few little bugs, but seeing the frequency of updates I am sure they will be fixed soon. Bugs I observed included:

  • The “LED brightness” setting did not work reliably (or at all? Hard to tell).
  • The LED stays on sometimes. Just constant, i.e. non-flashing, blue. At other times, it is completely off. Perhaps these states mean something, but if so: I have no idea what.
  • Several times, the “OK” button on the app screen was obscured by the iPhone’s keyboard. Resetting was the only fix, since there was no down arrow “remove keyboard” key.
  • The “select an accessory (this may take a few seconds)” screen takes up to 20s to appear sometimes.
  • Cosmetic bug: see the camera name in the first screen shot above?
  • The app (or device?) went to sleep sometimes. At these times, a complete reset of camera, device, and app were sometimes necessary to get everything working properly again.
  • When I connect the Pulse to the computer, every few minutes I get this warning:

screen-shot-2016-12-28-at-10-05-18

These are relatively minor issues, most of which will no doubt be fixed soon. None of these stop me from using the camera, and some may well have been the result of me trying out all the modes. Still, robustness could be improved.

Overall

Many devices do some of what Pulse does; few or none do all; and none do it in such a simple and, I dare say elegant, way. This device will have a permanent place in my bag, and you can expect to see time lapse photos etc in my future.

EDIT: Jan 15, 2017: a firmware update fixed at least some of the issues I mention. Stand by for more updated information soon.

Learn Topics: Going Wide!

Time to start the new year with some special camera techniques!

Another hands-on seminar. In Brantford; Jan 4 at 7pm, repeated Jan 8 at 1pm.

I often see people who have a good overview of all the theory, but who lack detailed knowledge of some advanced or special techniques.  So rather than “going deep” with a topic like “macro photography”, this time let’s get together and “go wide”: I cover a whole bunch of these special topics.

600_455404428

Topics for this hands-on , in studio session will include:

  • Setting up your camera: in-camera editing, custom controls, copyright/owner, personalized menus, optimal playback options, and a settings review for your camera.
  • How to get super fast flash to freeze super fast motion.
  • Stroboscopic Flash (see the picture above).
  • First or second curtain: the differences, when to use.
  • Video with DSLR: How to set up your camera for video.
  • Simple HDR: High Dynamic Range without hassle. We cover both “in camera” (like in a Canon 5D) HDR, or HDR in Lightroom.
  • Panoramas: how to do them in Lightroom.
  • Off-Camera Flash: How to get your flash off camera using [a] built-in light control, or [b] simple Pocketwizard radio triggers, or [c] Yongnuo advanced radio triggers.
  • Using a Pulse camera remote as a remote trigger, or for time lapse, long exposure, and HDR.
  • Q:A session: As time allows, anything you want to ask.

These sessions are hands-on ,so they are limited to 6 people each time. Go here to book:

Hope to see you there!


Fill, but not too much.

When doing a portrait, you use a main (“key”) light, a fill light, and optionally, a background light and a hair/edge light.

The purpose of that fill light, oddly, is to be darker than the main light. This introduces depth into your picture, and it narrows the subject’s face.

OK, so fill is darker than key, But perhaps not completely dark, like here:

20161023-1dx_1386-900

Nice and atmospheric, but perhaps a little too much drama.

So we add that fill light, but set it, say, two stops below the main light (so if your meter reads an aperture of f/8 for the main light, it should read f/4 for the fill light). Now we get what we wanted:

20161023-1dx_1387-900-2

If you make it too bright, i.e. you do not set it two stops below the key light but you set it at the same brightness, you might get something like this:

20161023-1dx_1387-900-4

As you see, the face looks wider now, and it loses that “real”, three-dimensional look.

So you should probably start at –2 stops for the fill light, and then adjust to taste: you are the artist, after all!

–––

Learn to do it yourself! Michael teaches portrait lighting and many, many other photography subjects at Sheridan College in Oakville, and to small groups or individual students all over the world, in person or via Google Hangouts. See http://learning.photography for details. 


Quick! Flash!

Speedlighter.ca. Speedlighter. Speedlighter!

So yeah, let me talk about speed for a moment. Speed as in “fast exposure speed, in order to freeze movement”. Fast exposure speed = short exposure time. 1/2 second is a long exposure time, i.e. a slow exposure. 1/1000 second, on the other hand, is a short exposure time, i.e. a fast exposure.

So how so you get a fast exposure time? One of two ways, it turns out. Either one of:

  • A short shutter time, or
  • A short light flash.

You see, what matters is the duration during which the light reaches the sensor. Whether that is short because the shutter only opens for a short time or because the light itself only flashes for a short time makes no difference at all. It is the same thing. A short exposure.

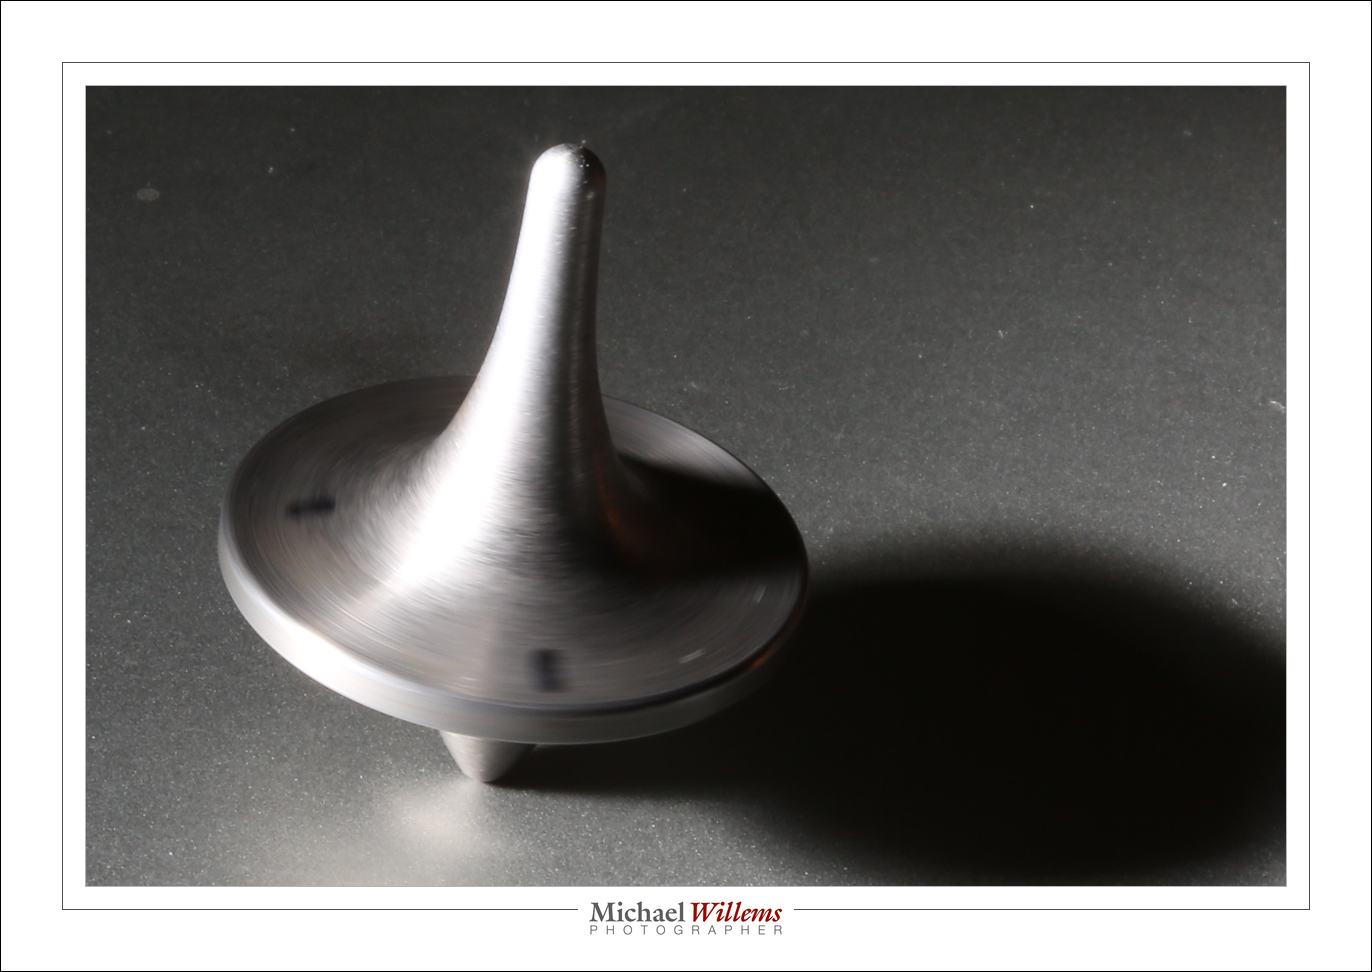
So let’s say I’m taking a fresh picture of a rapidly spinning spinning top. And let’s say further that I want to freeze the motion, to see the spinning top detail. Since I’m using a flash, I cannot use a fast flash shutter speed; The fastest I can go with my 5D camera is 1/200 of a second. So I’m going to have to achieve a fast exposure by using a short flash of light.

Fortunately, that is exactly what a flash fires. At full power it fires a flash of about 1000th of a second, or 1/4000 second at 1/4 power. Nice. Assuming that ambient light plays no role, your effective shutter speed is now nice and fast: 1/4000 second.

But not fast enough:

20161205-mw5d1909-1200
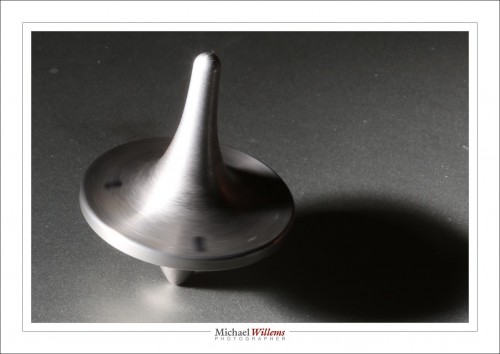
(1/200 sec, 400 ISO, f/32, 1/4 power flash)

OK, it’s still blurry, because it is spinning rather fast, so even 1/4000 second cannot freeze that motion. Now what?

The solution is in the sentence above: “At full power it fires a flash of about 1000th of a second, or 1/4000 second at 1/4 power”.

Because how does a flash set its power? Simply by shortening the time that it is on. Full power means 1/1000 second on a typical flash (small or large). Any longer and it overheats and burns out. So:

  • Half power means 1/2000 second, half the time.
  • Quarter power means a quarter of the original time, so 1/4000 second.

Oh wait. So “lower power flash” means “shorter duration flash”?

Yes! So if I set the flash to 1/128 power, I get an effective exposure time of 1/128,000 second. That’s like a really, really fast shutter:

20161205-mw5d1908-1200
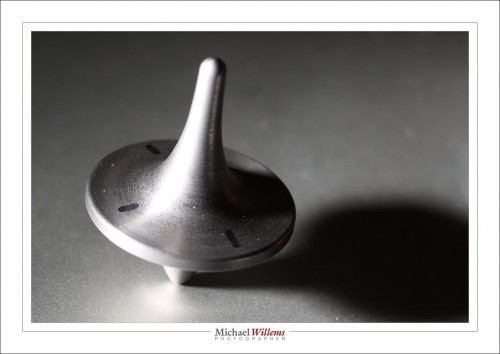
(1/200 sec, 400 ISO, f/5.6, 1/128 power flash)

Now, as you see, with an effective exposure time of about 1/128,000 second, the top’s motion is completely frozen. So while my shutter speed is unchanged, it does not matter. The light is only on for 1/128,000 second. So that is my effective shutter speed.

The lesson? To freeze motion, use low power flash. The lower the better.


Available light

Yes, available light rocks! Beautiful, colourful, soft, and so on. But when a photographer says “I am an available light photographer” or “I am a natural light photographer”, that usually means “I don’t know flash”.

Because it is often in the mixing of available light and flash light that things get interesting. Certainly in daylight.

Also–hiring a pro pays. Yes, you can get it done cheaper by Uncle Fred, but would you get pictures like these, from yesterday’s family shoot? (Hint: “no”.) A few hundred dollars and you have memories for life:

20161113-1dx_1945

20161113-1dx_1853

20161113-1dx_1819

20161113-1dx_1891

20161113-1dx_1935

If you can see these pictures, there’s plenty of available light. But had I not had my assistant hold the flash off the side near the subjects, they would have been silhouettes! Or I could have exposed for the subjects – in that case, a very bright, blown out background–with very little colour.

So you hire a pro for this. Right equipment (that super sharp lens); Right technique:

You have heard this from me before:

  1. Use the magic outdoors formula, and only vary f-number.
  2. Use long(-ish) lens (85mm prime in this case).
  3. Subjects away from the sun: means no squinting and the sun becomes hair-light.
  4. Fill with flash, off to the side for modelling.avoiding “flat” look.
  5. Flash fired in this case with radio triggers (Pocketwizards), and on manual, 1/8 power, with Honlphoto 12″ softbox (click on the small ad on the right to order, and use code word “willems” to get an additional 10% off).

BUT THERE IS MORE. If I print, I ensure that the print is perfect. Permanent photo paper. Pigment printing (not dye, which can fade). If a face is too pale, I selectively increase colour saturation in the face. And so on. That takes time, and it is exactly what Walmart et al do not do.

All this is what I teach in my live or online workshops: contact me to learn more, or see http://learning.photography .

And take some fall pictures, or have me do it!