Chili chicken.

I have always thought that for clarity, “white balance” should be called “colour balance”.

White balance means “interpret the red-blue-green respective channels to match the colour of the light hitting the subject, in order to neutralise the colour cast”. Your camera does this every time (Auto White Balance, or AWB).

When it gets it wrong, which sometimes happens, you see a red, or blue, or green cast to the light. In that case, you can correct this by manually telling the camera the colour of the incident light. Setting the white balance, in other words.

So you go from this (tungsten light):

MVWS0116

To this (corrected).

MVWS0117

That was the chili chicken I had with Baz Kanda, a very talented Ottawa/Mississauga photographer, just the other day. Or rather, it was the remains after we had eaten the chicken. And a photographer plays with his camera even when eating dinner. And when you use a fast lens, like the 35mm f/1.4 I was using here, available light is enough.

TIP: if you shoot RAW (which I do 99.9% of the time) you can leave your camera on “auto” at all times and do it in Lightroom or Photoshop later, on your computer. By clicking on a white item (e.g. the place) with teh white balance dropper. Yes, that’s a bit more work while editing – but it’s also a lot less work while shooting. Guess what I prefer, so I can concentrate on the Chilli Chicken?

Straight light

You know about Rembrandt lighting, loop lighting, broad and short lighting, and so on? If not, you will. But today a note about simple lighting for models, women, in general anyone who wants to look their best and show youth and beauty rather than experience and character (which can be a euphemism for age).

That is straight, flat lighting. Like this:

IMG_0162

As you see, that is nice, flattering light.

Whenever I shoot anyone where the main emphasis is on this person looking young and attractive, I draw an imaginary line from their face straight up at 45 degrees, i.e. not to either the left side or the right side. Where that line straight from their face hits the wall or ceiling, that is where I aim my flash. (An external flash – please, you don’t use the on-camera popup flash, do you?)

And when I do that, pictures like the one above result – when the model is as pretty. Even when the model isn’t as pretty, this light is best if you want to minimise wrinkles.

Smile!

The waitress at the pub yesterday, where Peter and I had dinner prior to the workshop in Richmond Hill:

waitress

As you can see, Peter is putting a bit of light into her face. Reflectors can be improvised: anything light will do.

And as before, it is amazing how people will smile when you point a camera into their faces. Try it!

Silhouettes

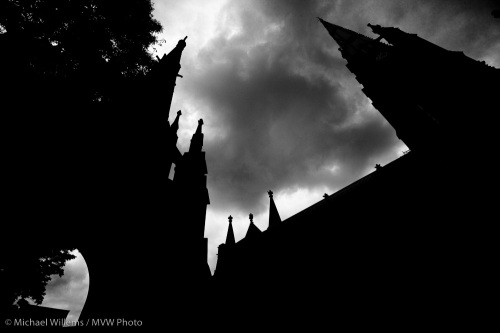
How and why do I shoot a silhouette, like this one I shot recently in Toronto:

Silhouette

Why? To create a mood. In this case a serious, almost grim, mood suits the Gothic cathedral theme, and goes together well with the threatening sky, and the wide lens adds to this “closing in on me” feeling. I suppose if I were religious this would not be the sort of picture I’d make!

How do you do this? This is just an underexposed picture, in essence, so it does not really matter how you get there. Manual, or metering off the sky, or exposure compensation (negative). Or all three.

Me, I use my spot meter to meter off the sky. Then I lock that in using Exposure lock, after I perhaps add some negative exposure compensation. Or more likely, I use manual – again, using the spot meter on the sky as my starting point.

My aim is to get the building almost black – I prefer to do the last bit in Lightroom, because if I am too low, I have to increase exposure which adds noise. Decreasing exposure does not add noise that way.

Go shoot a few silhouettes, for fun!

Richmond hill

applause-big

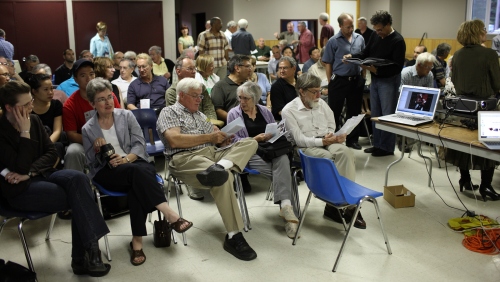
I did a great presentation tonight at the Richmond Hill camera club. 100+ people in the room and they were all sooo engaged, laughing out loud all evening – I was appreciated but more importantly, I really appreciated this wonderful audience.

r-hill2

And this serves as another reminder of how badly the engineers treat the fans of photography. Tonight’s subject was advanced camera use. You simply cannot learn this stuff from the manuals. The cameras are also not very well laid out in terms of logic. Learning illogical cameras from badly written manuals intended for those who already know it all: no wonder people are confused.

The good news: once it is explained well, you totally get it. And that’s why tonight’s audience had such a great time. And audience of over 100 is great – fantastic size. These pictures were taken before the presentation started in the standing-room-only space.

r-hill

Wonderful experience, and now I can get some sleep knowing we contributed just another little bit to Canada’s becoming the world’s best educated country in terms of photography education.

Nikon users: do you have this lens?

Hey, Nikon users with a non full-frame camera. Have you bought the new Nikon DX 35mm lens yet? If not, you may want to run, not walk, to your nearest Henry’s store to buy one.

Gizmodo discusses the new lens here and I could not agree more. This lens will give you the equivalent of a 50mm lens, which is a must have “standard”, as I discussed in an earlier post (“Nifty fifty“). Affordably.

Canon users, you can buy an expensive 35mm lens like my 35mm f/1.4 “L”, but that’s not affordable. Nikon has an edge here. A 50mm equivalent lens is a must-have for everyone, and this 35mm lens for crop cameras provides just that. Low weight, small size, low light ability and great ability to blur the backgrounds: you’ll never look back.

Lightroom file setup suggestion

A quick post today.

Adobe Lightroom has taken over most photographers’ post-production work. Myself included. Although Lightroom, an application for managing and editing and post-producing your images, takes a few days to learn, this is time well spent. Your post-production time (the time spent on your pictures after you get home) will be cut in half – or better. I recommend it.

When I teach Lightroom, people often ask me “how do you set it up?” – especially with regard to backups. Safety is everything.

So I thought that I might share my suggested file locations and backup methods with you here. Here’s how I do it.

  1. Catalog: The main Lightroom Catalog (which I renamed to something including my name, i.e. MVWPhoto.lrcat) lives on my main computer (in my case, a Mac). That’s standard.
  2. Photos: The actual images (raw) live on an external USB drive, in a folder called “PHOTOGRAPHY” (and within that, per year and then per date). New images go there too. That’s better than on my Mac.
  3. Catalog backups: I make a copy of the catalog every day (you can set up Lightroom that way, in Preferences). That copy also goes to the external drive (in a folder called “LR backups”).
  4. Photo backup: The external drive gets backed up to another external drive.I do this manually every day, or after every import.

To back up the first external disk (Iomega-1TB-1)  to the second (Iomega-1TB-2), I run the following little script:

#Photo disk sync
rsync -a –verbose –progress –stats –delete /Volumes/Iomega-1TB-1/PHOTOGRAPHY/ /Volumes/Iomega-1TB-2/PHOTOGRAPHY/

If you don’t know how to create or run a command line script, just get a computer person to help you with it. It’s that simple!

Miniature Assignment

Following up from previous posts, here’s an assignment.

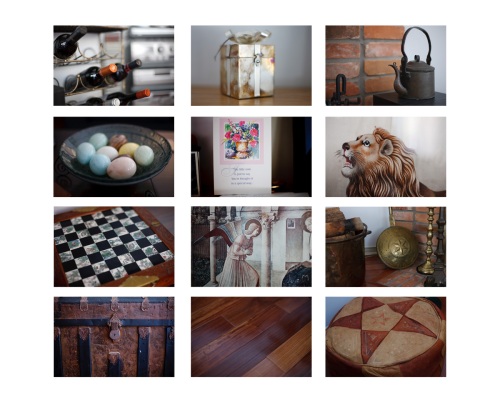
Put your 50mm f/1.8 lens on your camera and, using just available light, go shoot twelve things in your living room that show its character. Or shoot lots, but pick the best twelve.

Then put these together in a 3×4 arrangement, like this (yes that’s my living room):

Living Room Miniatures

This assignment forces you to look properly. What is it that shows the character? What makes for a simple shot? It also forces you to use the right techniques for simplifying and filling the frame. And you get to practice low-light shooting, selective focus, and so on.

But most of all, you get to think about subjects. Initially you’ll struggle to fine ten – then suddenly 100 pictures will suggest themselves.

Show me your results!

Annie is safe.. for now.

CNN reports that Annie Leibovitz is safe, for now: lawsuit dropped and payment extended.

I breathe a sigh of relief. If Annie Leibovitz could not make it as a photographer (her day rates for a portrait are $100,000, apparently), then who can? Plus, she is such an icon: I would hate for anything bad to happen. Even though she is “controversial” – she has photographed naked people. (Like John Lennon, on the very day he died).

In the USA in 2009, that is enough to make you “controversial”?

One amusing note when you follow the link is that CNN has put that article in the “Crime” section (see the URL).