Creative light

There is just one more spot open for the all-day Creative Flash course in Mono, Ontario, an hour north of Toronto, Saturday.

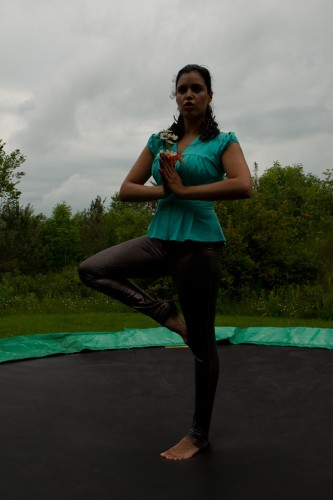
Using a professional model and pro lighting equipment on Canon, Nikon and other camera brands, Joseph Marranca and I will teach our students to take shots not like this:

Tara Elizabeth

Tara Elizabeth

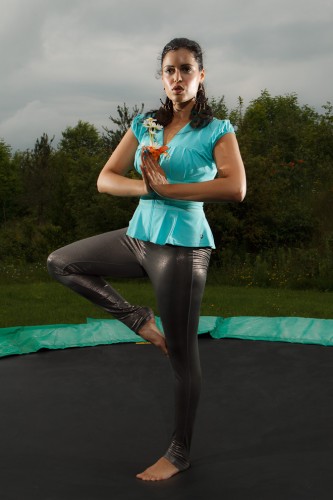
But instead like this:

Tara Elizabeth

Tara Elizabeth

You see how important light is? That’s what these workshops are about, to make users comfortable with the technical and creative aspects of light,

And they are about going home with portfolio shots.

And about having fun with cameras, all day!

Too much contrast!

A student wrote to ask me the following:

Sometimes it is impossible to avoid part of your picture getting over-exposed without your main subject becoming very dark. I didn’t have great improvement with a smaller aperture. What do I have to do in this case?

Good question. A sensor is more like slide film than like negatives: the dynamic range is limited. Meaning you can only show so much difference between lightest and darkest parts of your image.

So when I point at a person in front of a window, they are a silhouette. The aperture makes no difference in this case: not by itself, anyway. But if I increase the exposure (by using  my spot meter, manual mode, or exposure compensation) then they can be correctly exposed, but now the sky behind them is all blown out. Uh oh!

So what can I do?

As usual, there is no single answer. I can (and often do!) the following:

  • Move myself. If I shoot from the other side, no problem.
  • Move my subject or move my light (unless it is the sun!)
  • Use a reflector. That is why photographers always carry reflectors.
  • Use my flash! This is why on a sunny day we carry our flash. Sun is very contrasty light. With a flash, we minimize the differences.

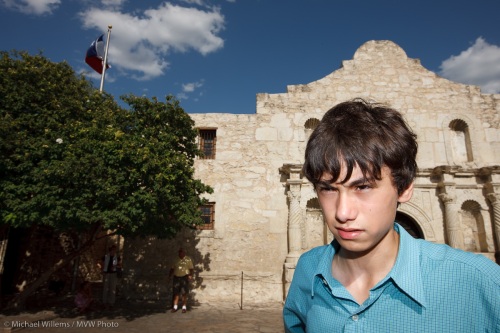
An example of flash outside:

Daniel at the Alamo, photo Michael Willems

Daniel at the Alamo

Without the flash, Daniel would have been too dark (look under his chin), or else the Alamo would have been way too bright.

There is one other way that sometimes works.

I can shoot RAW and hope there is enough dynamic range to contain detail in the sky; and then adjust afterward, using HDR – High Dynamic Range.

I can do this either in Lightroom, by using “filll light”, “recovery” and other exposure adjustments, or by using specialized HDR software like Photomatix.

Photomatix HDR example from one RAW, by Michael Willems

Photomatix HDR example from one RAW

The original image (which I took Monday in Toronto’s Distillery District) had a very bright, blown out sky, and the foreground was too dark.

But because I shot RAW, I was lucky and there was enough detail “hidden” in the file, and I was able to bring it out.

This works as follows:

  1. Shoot a RAW image, expose “in between”.
  2. Copy it so that you have five identical images.
  3. Make one image two stops darker; make one one stop darker; keep one at the shot setting; make one one stop brighter; and make one two stops brighter. If you shot “in between”, each image should have detail on part of the image.
  4. Now run Photomatix software (I used a demo version here, see the watermark).

This is no panacea, and HDR (High Dynamic Range) can look gimmicky and unnatural, but when this works, it can help save you from these high contrast situations.

Normally, for HDR you take multiple exposures, of course. But there is so much “extra” information in a RAW file thatyou can get away with this technique quite often.

Welcome to speedlighter

Speedlighter.ca: the new home of Michael’s blog.

Why now? Because WordPress changed themes, dropped layouts, and showed themselves to be untrustworthy. But also because now I can do more: in particular I can now add a wide range of “plugins” on this blog.

Why “speedlighter”? As you know, a small flash is called a speedlight. Because they are fast to use. And I specialize in speedlighting: I teach lighting seminars all over. I teach pros as well as beginners how to use flash technically and creatively. I will help you know the exact differences between Nikon’s CLS/iTTL and Canon’s e-TTL. I love small modifiers like the Honl Photo gels, grids, softbox, reflectors etc.

Michael Willems. Lighting: three small speedlites

Photography is about composition/subject, moment and light. While I talk about all three, I particularly like to help people understand light, and how small flashes can help produce professional photography quickly and easily, without lots of heavy equipment.


Matt

Matt of WordPress dot com explained, I now see, why he inconvenienced me and thousands of other bloggers: see http://ma.tt/2010/07/syn-thesis-1/#comment-481953

Quote: “regardless we’ve always had attribution on it. We’re replacing it anyway, don’t want any of his junk touching our sites.”

So he killed my blog layout and widgets to satisfy his own  need to have a great designer’s “junk” not on his site? What an inconsiderate person. All the prejudices I ever had against spoilt Californian kids are bubbling up. Except Matt tells me he is not even Californian!

Postscript: so OK, I got a bit angry. Can you see why, though?

Afternoon = Gel

Another flash tip for you today.

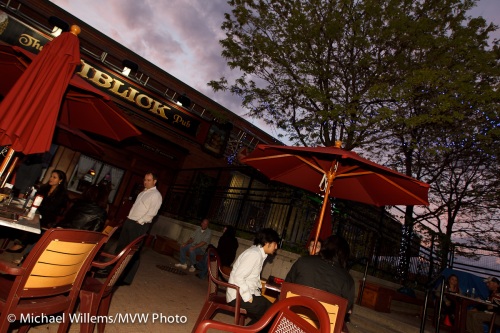
Later afternoon pictures. You can make them look better by adding your own “golden hour” glow. Like this:

Patio at dusk, photo by Michael Willems

Patio at dusk, photo by Michael Willems

To take a picture like this, you might do the following:

  • Use an on-camera flash while there is still light;
  • First set your camera’s exposure (ISO, aperture, shutter) to get a nice background sky. Ignore the foreground for now.
  • Then position yourself such that there is no close subject (remember the inverse square law).
  • Use a half CTO gel on the flash (I used a Honl Photo half CTO gel on the speedstrap on my 580EX);
  • White balance to “Flash”.
  • Take a test shot. If the flash is too bright or too dark, use Flash compensation (+ or 1) to adjust. If the background is not right, adjust ISO, shutter or aperture.
  • A wide angle lens makes it easier.

And Bob’s your uncle: nice colours.

Four more days

Saturday I’ll be here:

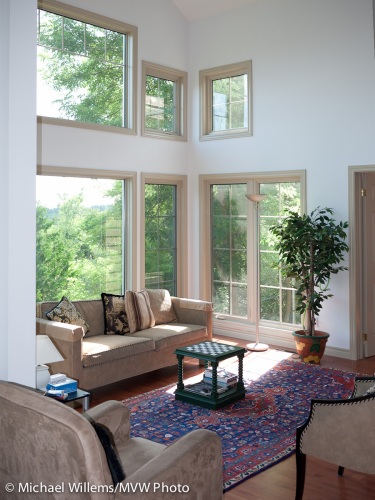
Mono, country home with flash

Mono, country home (with flash)

But it will be rearranged and full of lights. This is my Mono, Ont. Country home, where Joseph Marranca and I are holding our all-day Advanced Flash workshop.

That snap was taken with the little Panasonic GF1, with its built in little flash raised to very successfully fill in the shadows.

WordPress gone mad?

My blog’s “theme” appears to have spontaneously changed to “Coraline”. Without me doing anything! I wondered what had happened.

And when I go to WordPress.com support, I get:

Support Temporarily Closed

Support is temporarily closed at the moment. We will reopen very soon.

Even worse:

Support is currently closed as staff meet offsite brainstorming ways to make things better. We will be dropping into the forums regularly during the hiatus, and we’ll formally reopen on August 16th.

And then I find out that “Cutline”, my theme, has been “phased out” and replaced by Coraline.

No questions, no notice: just make my theme ugly. Thanks. Time to start thinking about moving my blog. This is a mission-critical endeavour for me, and this kind of nonsense, no support and changes without asking or even telling, is not good enough.

If your blog is important, best stay clear of WordPress.com, is my advice.

Know any good WordPress hosting providers, anyone? Providers who can move my blog and all its contents from WordPress?

What camera should I buy?

Today, a part answer to the question I get often: “what camera should I buy”.

I understand this question very well. There are many options. Which one is for me? How, as a beginner or intermediate user, do I even begin to choose?

Panasonic GF1, photo Michael Willems

Panasonic GF1, photo Michael Willems

A reader asked me the following (summarised):

“My goal is to replace the Lumix I own – my first digital camera all the way back from 2005.  It takes INCREDIBLE outdoor photos and people always think I have a really fancy DSLR.  But it was around $350 back then.  I’ve noticed that indoor photos are much worse, though slightly better than the point and shoots my friends own (or perhaps I am a better photog?).

The camera has been through a lot of trips and is carried daily. I would like to replace it with another similar camera – one that is easily portable and is not expensive because I don’t want to be afraid to toss it in my purse or the car.  I know, I should probably do DSLR, but really, I am not aspiring to be professional.  I just want crisp, lovely photos.

My goal is to spend around $300, knowing it will be replaced in a few years by something a bit better.  I also need the ability to have better photos in low light situations and to shoot quickly.

I’ve researched this a lot of crutchfied.com, where I plan to purchase, but I haven’t asked a For Real Photographer.  Your website seems so approachable, so I thought I would ask and you could direct me to your personal recommendations or another site that you trust.”

That is a great question. And while perhaps I cannot come up with the exact camera, I think I can do better: I can give you insight into what is important, so you can make your own well-informed choice.

Do you need a new camera?

First, do you need to replace your camera at all? Pictures are about the photographer, not about the camera. “Your camera takes great pictures” actually means “You take great pictures”. And note that since a few years ago, megapixels no longer matter: I would say “6 or more is enough, 8 or more is plenty”.

But in this case I would say yes – you probably do need a new camera – because your camera is five years old (so unlike all modern cameras, it may not have a sensor with quite enough megapixels) and in particular because you mention the two things which are indeed huge issues, and where even small  cameras have indeed gotten better: low-light ability and shutter release delay (where you press the button and nothing happens for a second). These are the big drawbacks of point-and-shoots but are getting better.

So let’s look at a few of the pointers to help you decide.

DSLR or point-and-shoot?

Indeed, as you quite rightly surmise, a DSLR is the way to go to get full creative control, instant shutter release, and very low noise and hence, great low-light abilities. The pros use DSLRs for a reason.

But a DSLR is definitely not just for pros. An entry-level DSLR does not have to cost much. Plus, with a small amount of training, like a couple of the great Henrys School of Imaging courses, you can operate it like a pro.

Digital SLR camera, by Michael Willems

Digital SLR camera

Why is an SLR better? The main reasons, in a nutshell, are:

  • Larger sensor, meaning much lower noise (less grainy images, especially indoors and in low light).
  • Larger lens, meaning better quality.
  • Much better selective depth-of-field (blurry backgrounds when you want them).
  • Interchangeable lenses (and with that, wider lenses possible).
  • No shutter delay.

Look at that list: there are no free lunches: this is where SLRs are better. This is why the pros have them. “But I want all those advantages in a small point-and-shoot!” will not fly, unfortunately.

That said, there are also of course some valid reasons for a smaller camera, and you seem to have these needs. “Budget” and “Size and Portability”, in particular.  Even some pros – like me – use a point-and-shoot sometimes (usually a Canon G11/G10/G9 or a “Micro Four Thirds” camera like the one at the top).

So, if you cannot consider a small DSLR, like a Canon Digital Rebel XS, then perhaps a smaller, point-and-shoot type camera. On to the next question.

What type of smaller camera?

There are several types:

  1. Small point-and-shoot with very few controls.
  2. Small point-and-shoot with additional “manual” controls.
  3. “Prosumer” cameras, almost as large as an SLR but with a fixed lens
  4. “Semi-pro” point and shoots, like the Canon G11 and like the large-sensor “micro four thirds” cameras including the Panasonic GF-1 and the Olympus PEN.

For you, with your stated needs, I would avoid 1: too limited. I would also avoid 3: too large, while still fitted with a tiny sensor. Might as well get an SLR. And while I love them, in your case I would avoid 4 only because of budget – these cost $500-1,000.

So that leaves category 2: small cameras with enough controls to be creative when you like.

To be creative, you need to be able to select Aperture Mode (A/Av) and shutter speed priority mode (S/Tv) when you want them. This usually means a dial at the top. In this category, look for prices between $200 and $400, roughly.

What to look for?

So in your category, here are some of the most important things to look for.

  • Size and feel. Buy a camera whose handling you like!
  • Interface. Do you like the menus and controls, or do you find them horribly confusing?
  • How convenient are the physical controls? “The more buttons the better”, since this alleviates the need to go into menus for every adjustment you want to make. But some controls on small cameras are easily pushed or rotated when you do not intend to.
  • How wide will it zoom? The ability to take wide-angle pictures is often underestimated: a good photographer will tend to use wide angles more often than telephoto settings.
  • How noisy (grainy) are the pictures in low light (i.e. at high ISO)? The larger the sensor, the better, and the fewer pixels, the better (that is why Canon very sensibly went down in megapixels from the G10 to the G11).
  • What shutter delay? After you focus, when you press the shutter, how long does it take the camera to click? If this takes an appreciable time, buy a different camera.
  • Does it have a viewfinder? I personally like cameras to have one, but that said, I bought a point-and-shoot without one.

Notice that I am not talking about “how many megapixels does it have?” and “how many times zoom does it have?”. While every aspect of a camera is important, a lot of this is marketing.

So what are the options?

So if you are indeed in need of a small, portable camera, not an SLR; and your budget is as stated, then there are many cameras to choose from. Too many for me to mention here.

I personally like the small Canon cameras and the small Panasonic Lumix cameras. The Panasonic LX3 comes to mind, as does the Canon G11, but these are more “category 4” cameras and both cost more than you want to spend.

Other options include the Panasonic DMC-ZS7 and DMC-Z3S, the Canon SD-4000, SX-210 and SD-3500, and closer to your price range, the Lumix DMC-ZR3 and ZS5.

But that is a partial list. To get closer to your choice, taking into account the fact you need to like the camera’s feel as well, I would do the following:

  • Go to Henry’s (if you are in Ontario) and ask there, keeping the above requirements in mind. Disclaimer: I teach photography at the Henry’s School of Imaging – but I am not employed by them and can be entirely independent. The reason I like them is that all store staff really know photography. Their customer service is also very good.
  • Research your options on dpreview.com – the gold standard of technical reviews. If you are lucky enough for your camera of choice to have been reviewed there, you will get all the pros and cons in a well-though out review.

So I would go to my nearest Henrys (or similar specialized photo retailer, if you are not in Canada) store to see – keep the requirements in mind.

Where to buy?

While you can buy anywhere, I would still be biased toward buying locally: warranties are not valid if you buy abroad; that plus the service and the free consulting you get in a specialized store is often easily worth the premium.

So I would say go hold the camera and play with it, ask about low noise at higher ISO, and check the shutter delay. That is the best way.

Above all: have fun and keep shooting!

Night Sky

A black sky may look black to us.

But to the camera, it is not that way:

Night Sky, by Michael Willems

Night Sky, by Michael Willems

At least if you set up the camera correctly.

My recipe was:

  • Canon 1Ds Mark III on a tripod
  • Using the Canon 35mm f/1.4 L prime lens
  • Focus: Manual, set to infinity
  • Exposure: Manual, f/1.4, 30 seconds
  • 200 ISO

Note the following:

  • Lightroom will automatically remove “stuck pixels”
  • The sky starts off lighter, and goes darker, so adjustments may be necessary.
  • Focus needs to be accurate: do it before it gets dark.
  • A city in the distance will light up the sky greatly.

Try it. And above all, have fun.